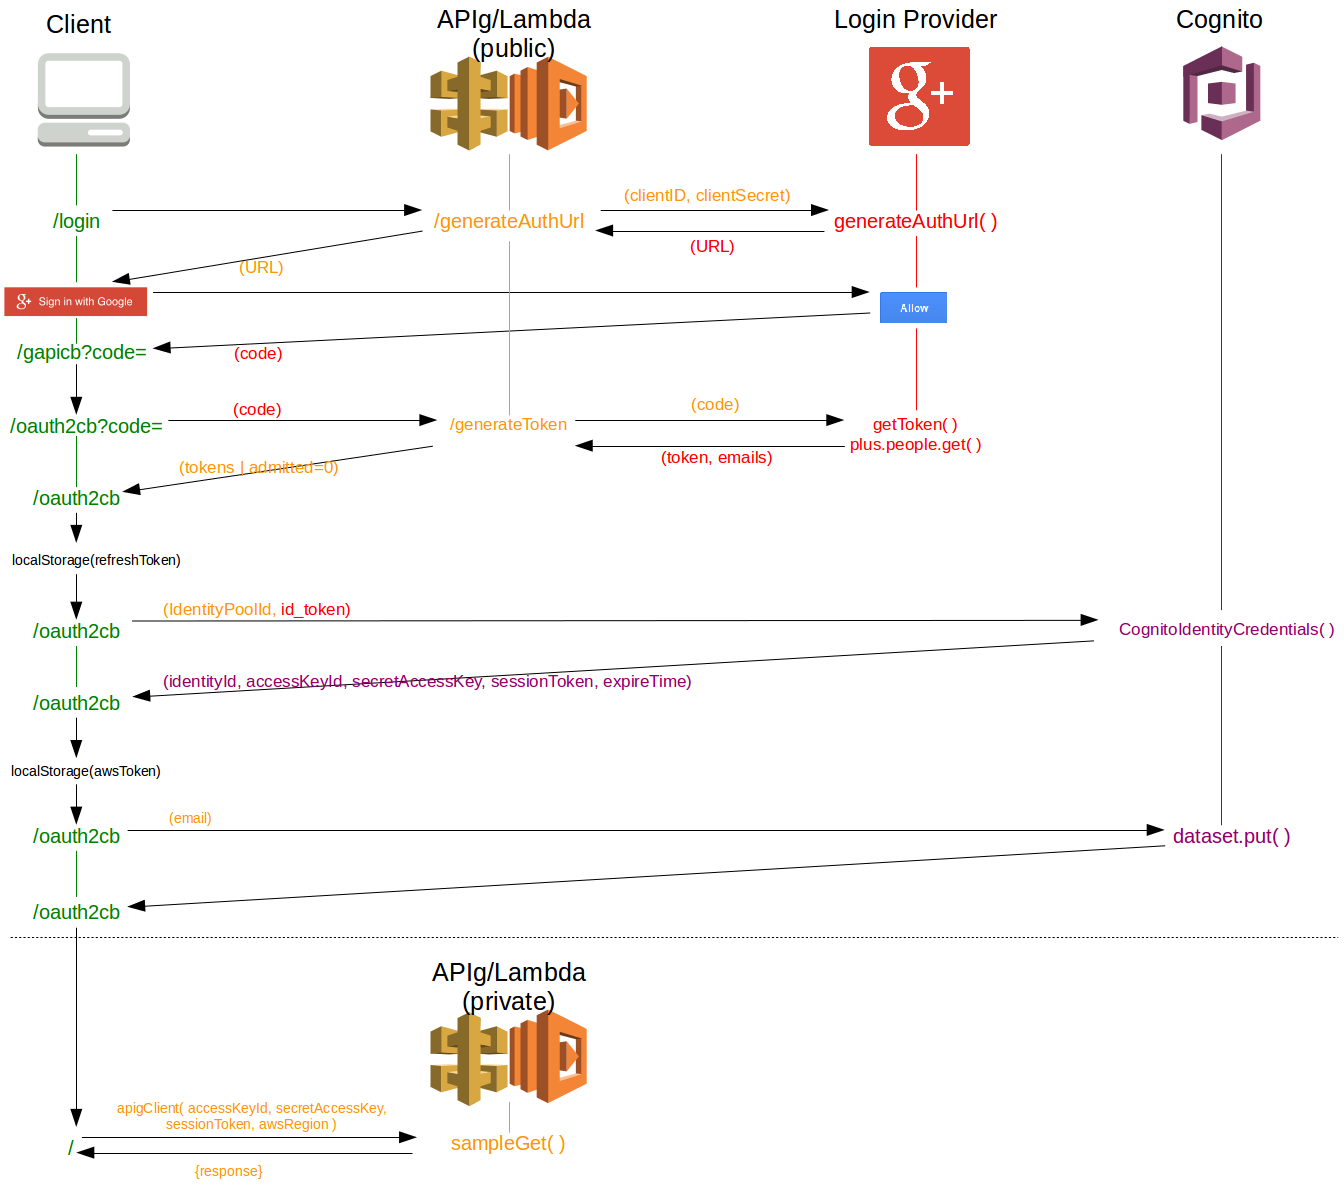
In order to secure a single-page webapp hosted in S3 and backed up by Lambda/API Gateway, OAuth2 can be used with Cognito and a Web Identity Federation provider (eg: Google+, Facebook, etc). Steps 1-2 of this how-to will create a sample Lambda function served by API Gateway and secured using AWS-IAM. Steps 3-12 document the steps to allow a user to login to access the secured Lambda/API. If you already have a secured Lambda/API Gateway set up you can skip directly to Step 3 but I recommend reading through the first two Steps to understand how to secure your existing API Gateway resources. This how-to assumes previous experience with Lambda functions and roles.
Step 1: Create a sample Lambda function
This function expects no inputs and returns a simple message. It will be placed behind the API Gateway resource created in Step 2 and secured with AWS-IAM. It will be used for testing Cognito Authentication.
- Login to the AWS Lambda console
- Click on [Create a Lambda function]
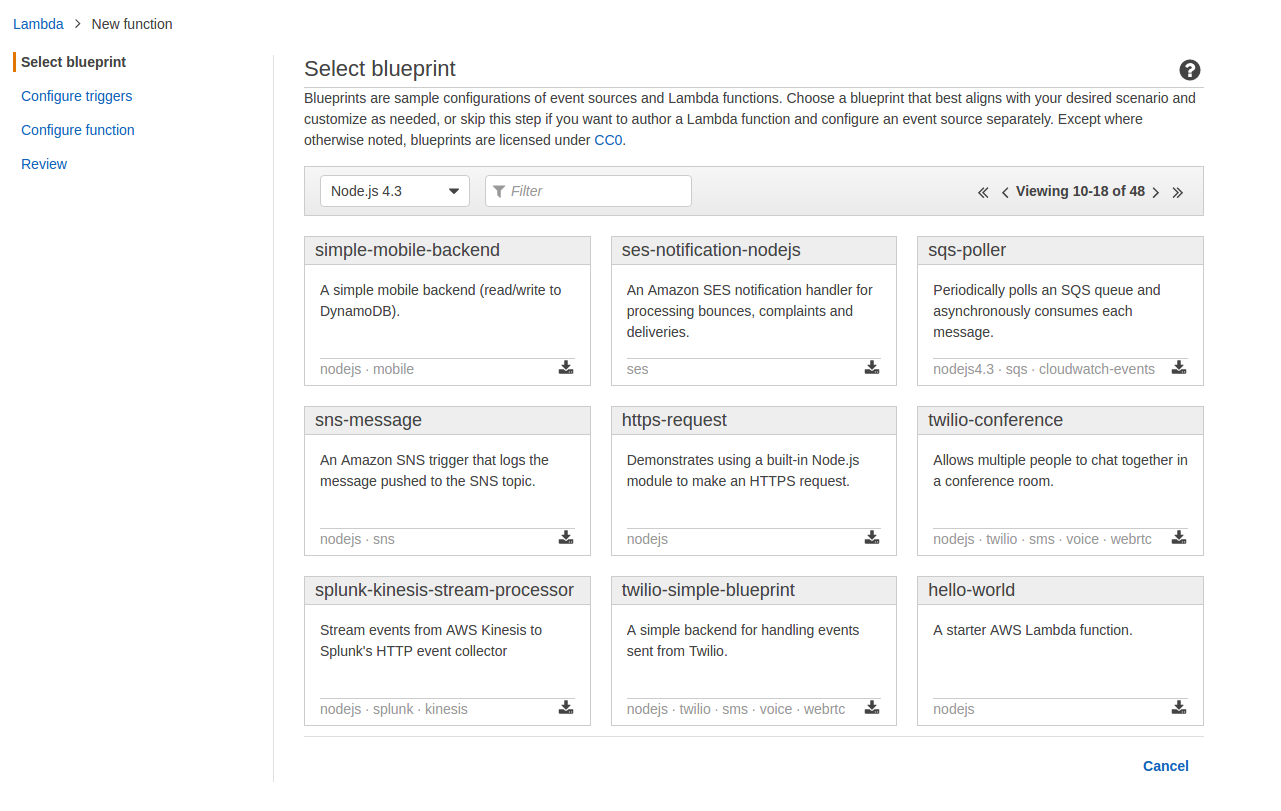
- Select the hello-world blueprint for Node.js 4.3
- Click on [Next]
- For Name enter hello-world
- For Description enter A starter AWS Lambda function
- For Runtime make sure that Node.js 4.3 is selected
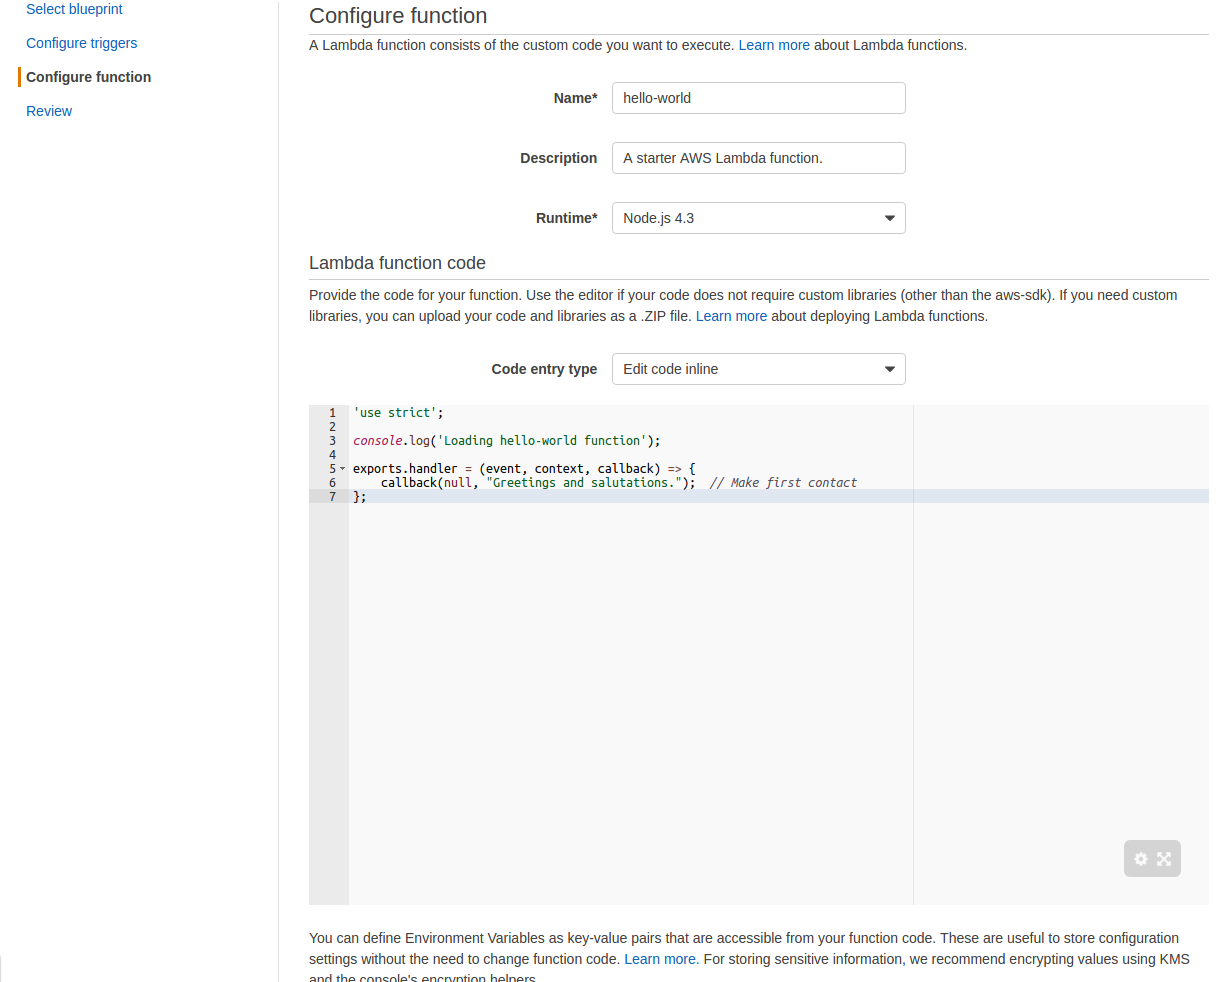
- For Code entry type make sure that Edit code inline is selected and enter the following in the code box:
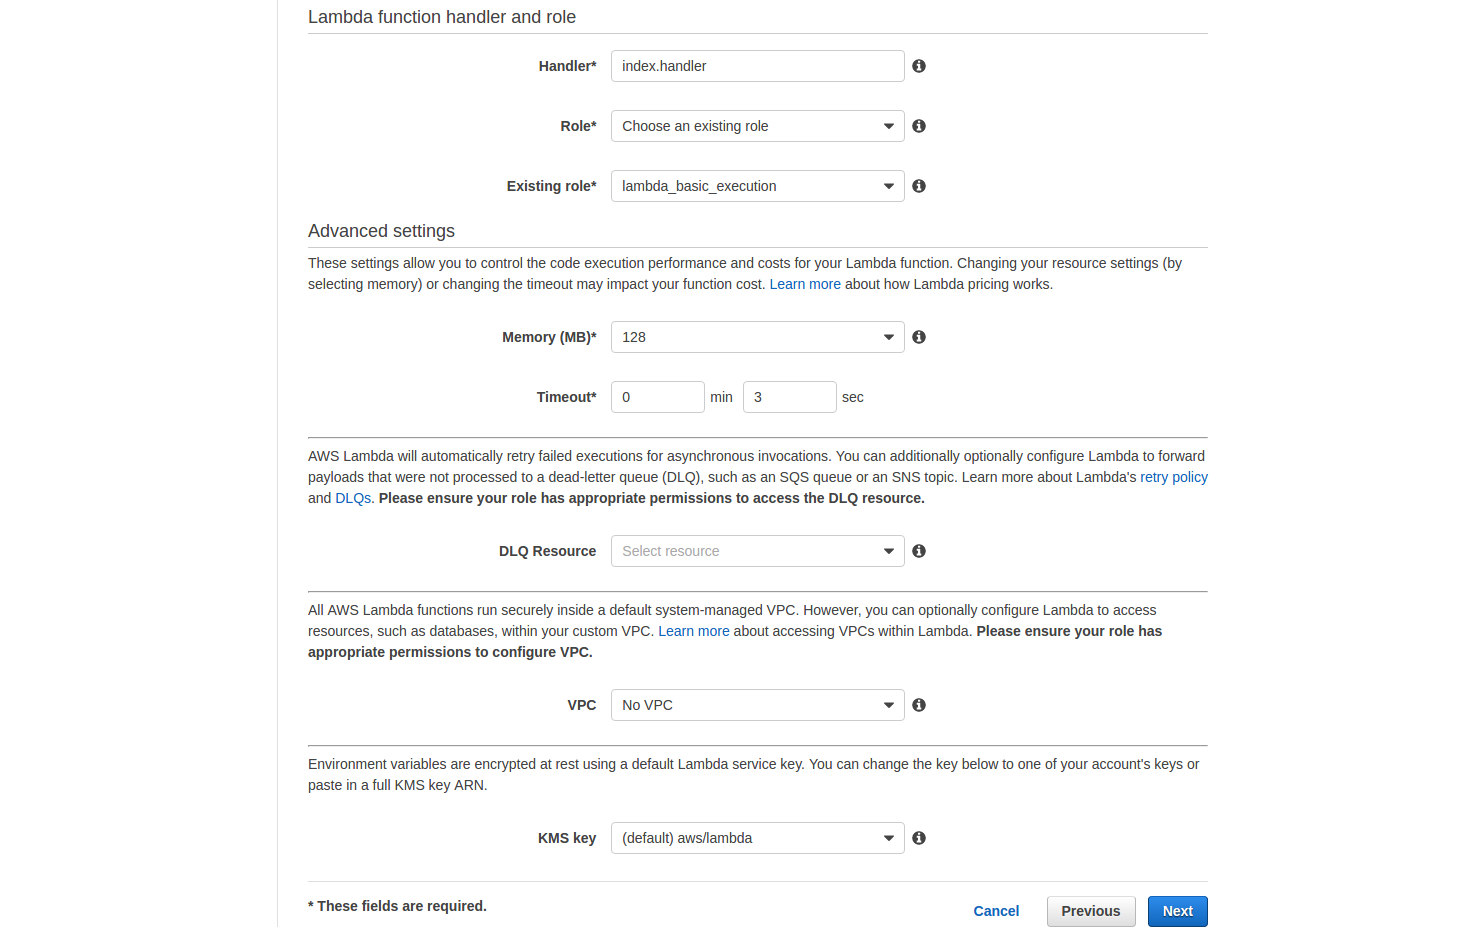
'use strict'; console.log('Loading hello-world function'); exports.handler = (event, context, callback) => { callback(null, "Greetings and salutations."); // Make first contact }; - For Handler make sure index.handler entered
- For Role select Choose an existing role
- For Existing Role select lambda_basic_execution
- Leave the rest of the settings as they are and click on [Next]
- Review the settings and click on [Create function]
- Click on [Test] and then [Save and test] the result "Greetings and salutations" should be returned
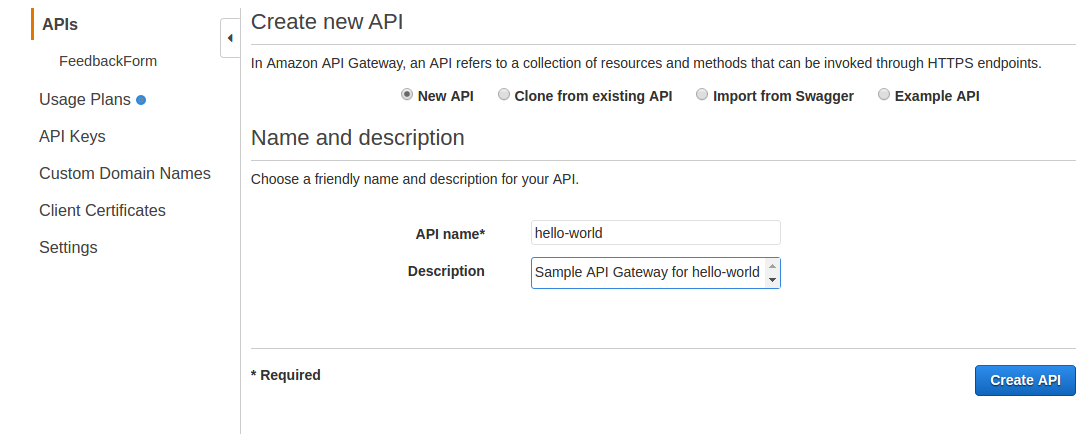
Step 2: Create sample API Gateway
This API Gateway will be serve sample Lambda function created in Step 1. Once it is secured with AWS-IAM it will not be accessible without Cognito authorization.
- Login to the AWS API Gateway console
- Click on [Create API]
- Select New API
- For API Name enter hello-world
- For Description enter Sample API Gateway for hello-world lambda
- Click on Create API
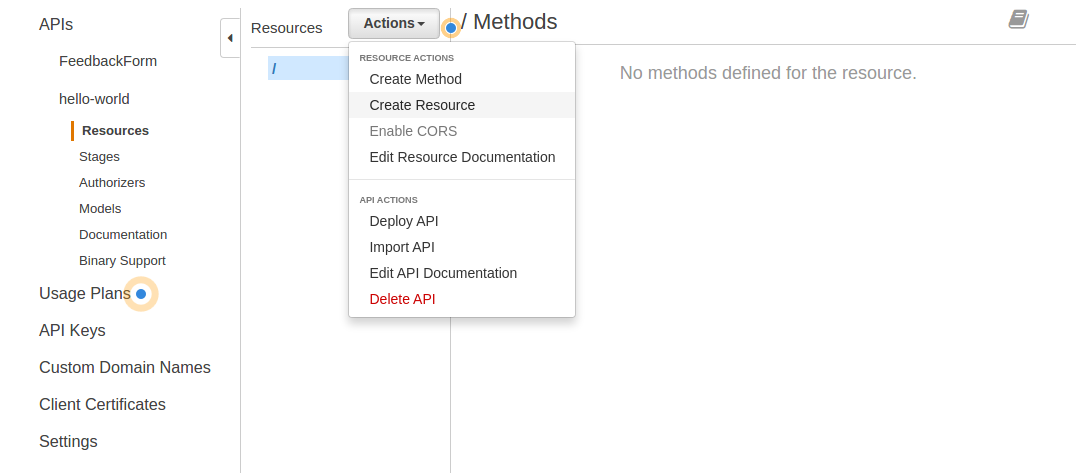
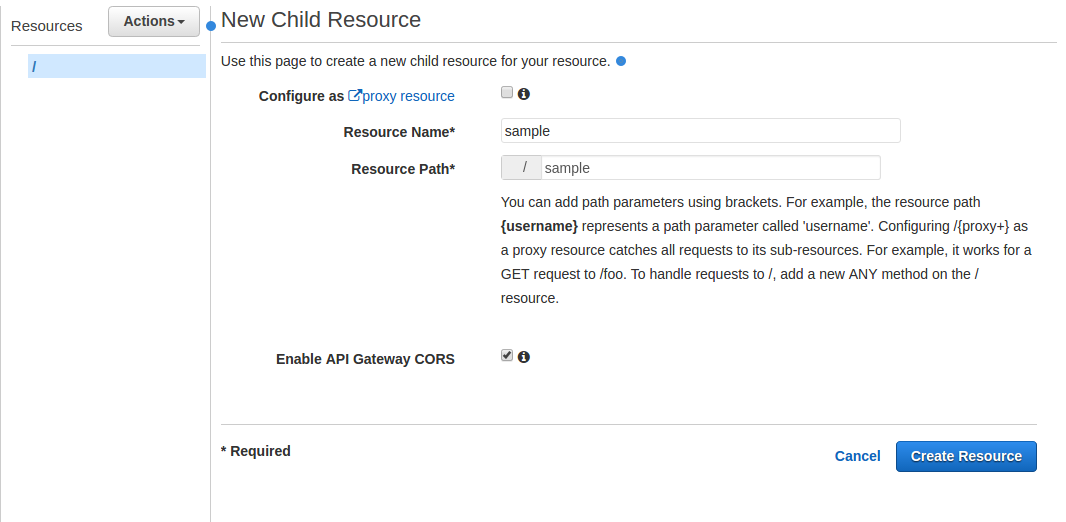
- Pulldown the Action menu and select Create Resource
- For Resource Name enter sample which should autopopulate Resource Path with /sample
- Make sure the Enable API Gateway CORS box is checked
- Click on [Create Resource]
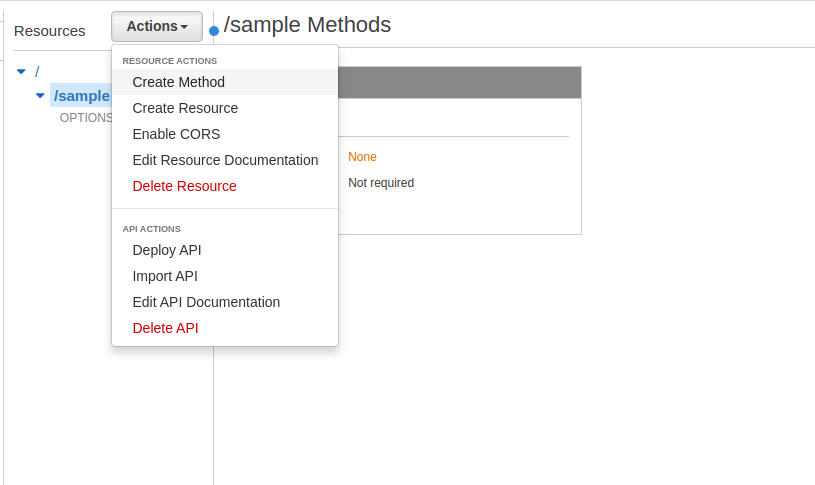
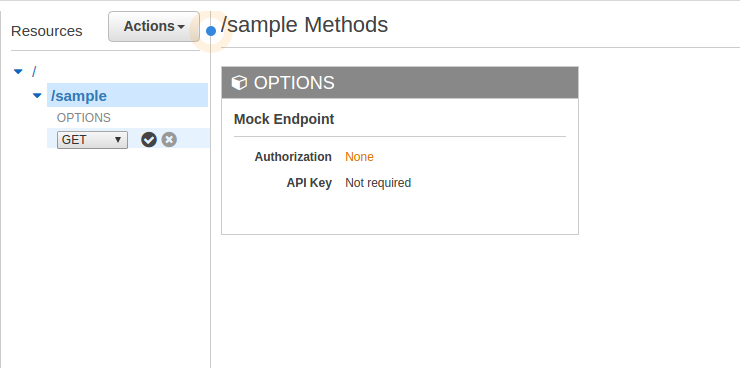
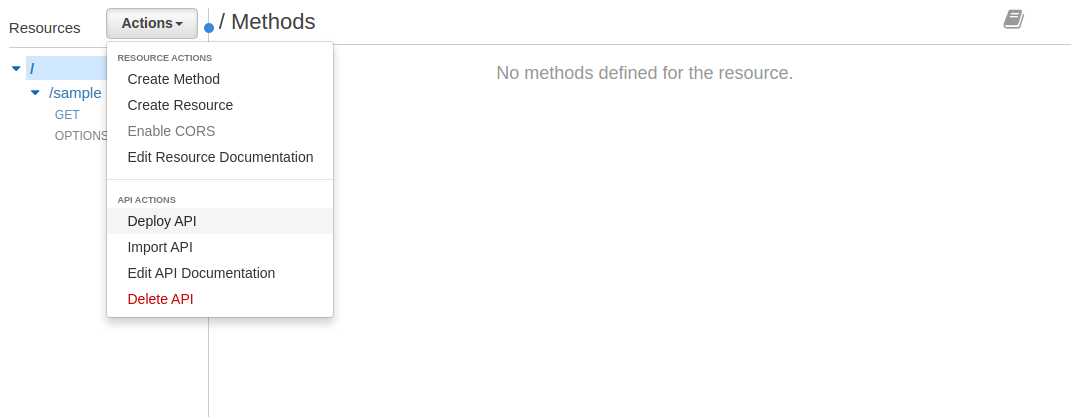
- Make sure the newly created /sample resource is highlighted and pull down the Actions menu and select Create Method
- From the pulldown menu select GET and click the checkmark
- For Integration Type select Lambda Function
- For Lambda Region select the region your Lambda function was created in
- For Lambda Function enter hello-world
- Click on [Save]
- Click [OK]
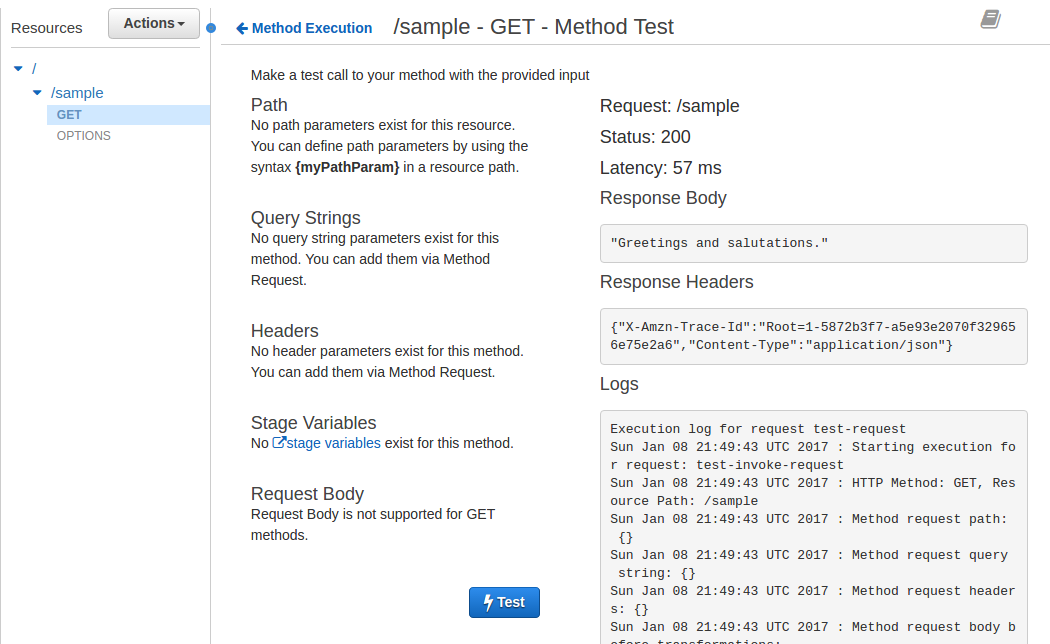
- Click on Test and then click on [Test], the Response Body should be "Greetings and salutations."
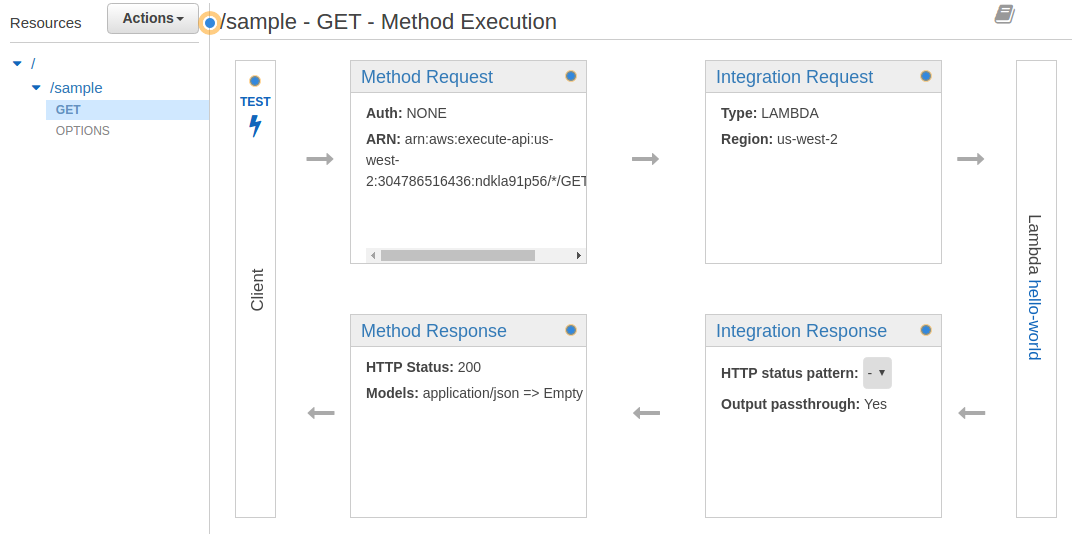
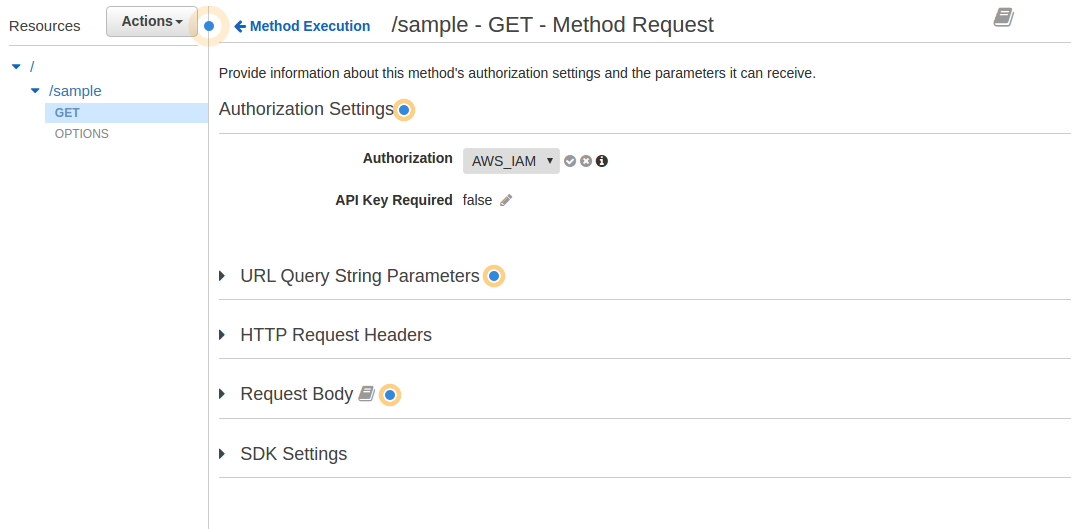
- Click on <- Method Execution to return to the Method page and click on Method Request
- Click on the Pencil icon next to Authorization
- Select AWS_IAM and click on the checkmark
- Click on <- Method Execution
- In the Method Request box locate and copy down the ARN: string, this will be used in Step 9.7
- In the Resources panel highlight the GET method under the /sample resource
- Pull down the Actions menu and select Enable CORS
- Click on [Enable CORS and replace existing CORS headers]
- Click on [Yes, replace existing values]
- In the Resources panel highlight the root / resource
- Pull down the Actions menu and select Deploy API
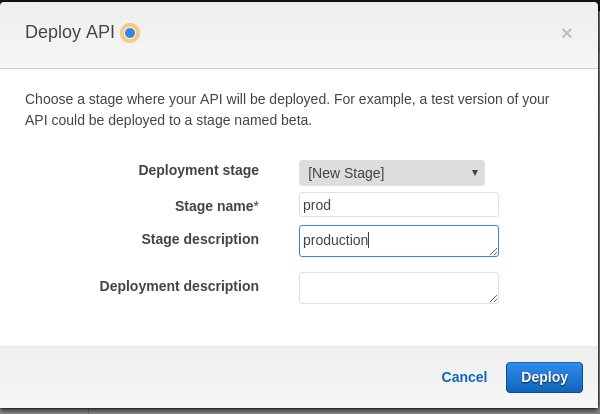
- For Deployment Stage select [New Stage]
- For Stage Name enter prod
- For Stage Description enter production
- Click on [Deploy]
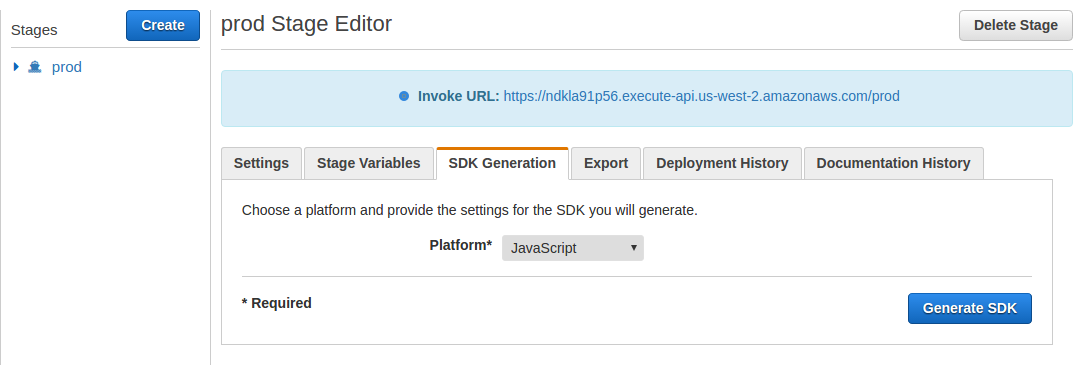
- This should take you to the prod Stage Editor page and the Invoke URL should be highlighted in blue at the top of the page. However, if you attempt to Invoke this URL you will receive {"message": "Missing Authentication Token"} because we enabled AWS_IAM Authorization
- Click on the SDK Generation tab
- Pull down the Platform menu and select Javascript
- Click on [Generate SDK]
- Download and save the generated javascript_{date}.zip file as it will be needed in Step 10.5


Step 3: Create S3 bucket to host the single-page webapp
The frontend html and js files will be hosted in S3. A bucket will need to be created and configured for website hosting.
- Login to the AWS S3 console
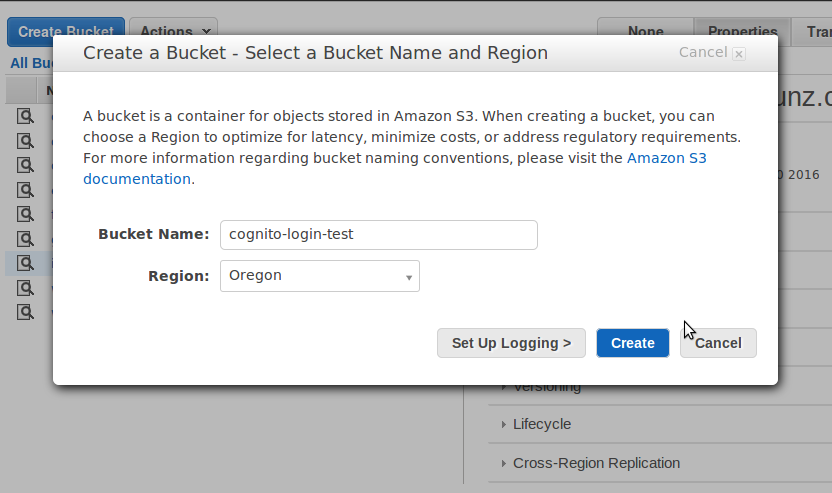
- Click on [Create Bucket]
- Give the bucket a globally unique name, select a region, and click on [Create]
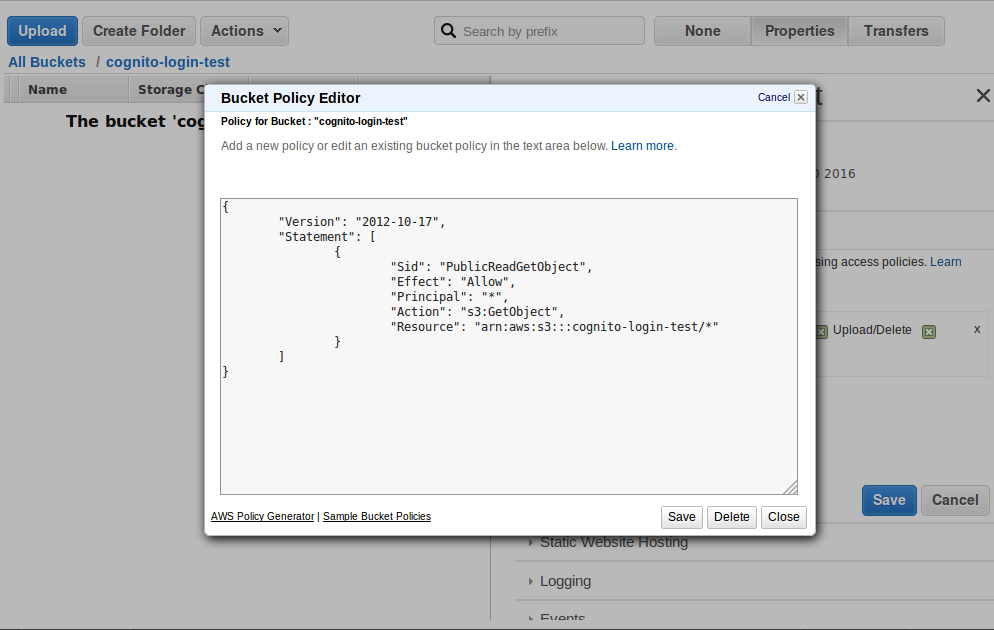
- Select the new bucket, click on [Properties] and click on Permissions
- Click on [Add bucket policy] and enter the following: (replace NAMEOFBUCKET below with the name of the bucket you just created)
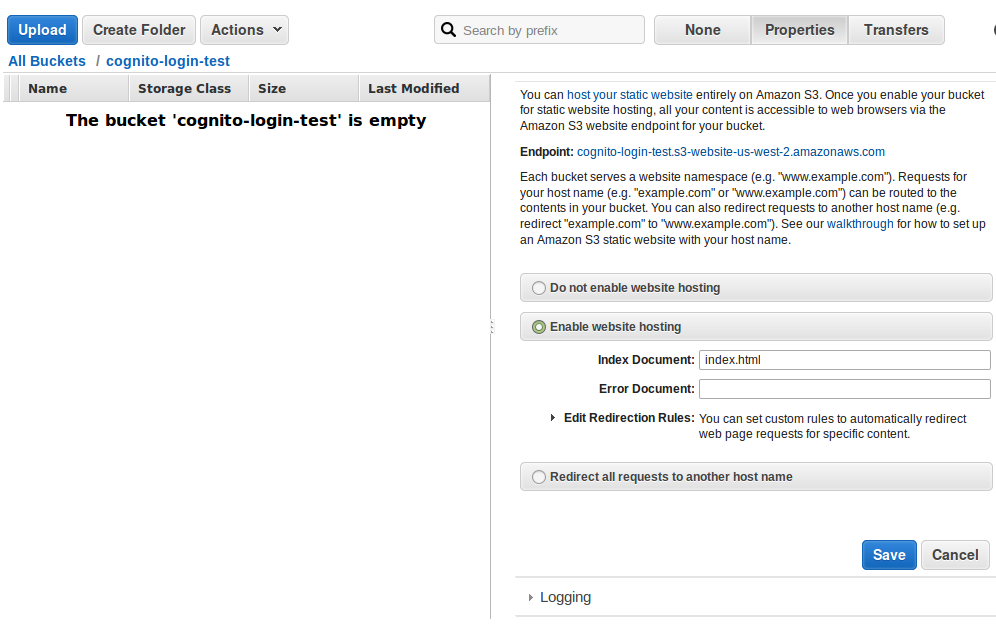
{ "Version": "2012-10-17", "Statement": [ { "Sid": "PublicReadGetObject", "Effect": "Allow", "Principal": "*", "Action": "s3:GetObject", "Resource": "arn:aws:s3:::NAMEOFBUCKET/*" } ] } - Click on Static Website Hosting > Enable website hosting
- For Index Document enter index.html and click Save
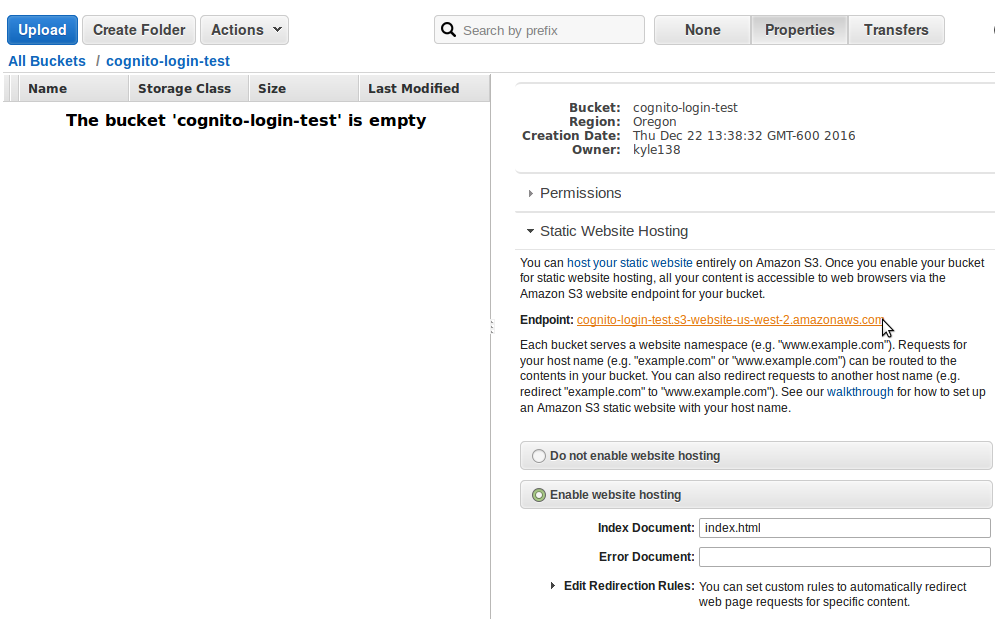
- Copy the Endpoint: link provided as we will be using it in the Step 4.8.b and Step 10.3.a
Step 4: Create Project and Enable Google+ API in Google Developer Console
A Web Identity Federation provider will be used to handle authentication so that end users can use an account they already have rather than creating a separate one for this page. In this example we will use Google+.
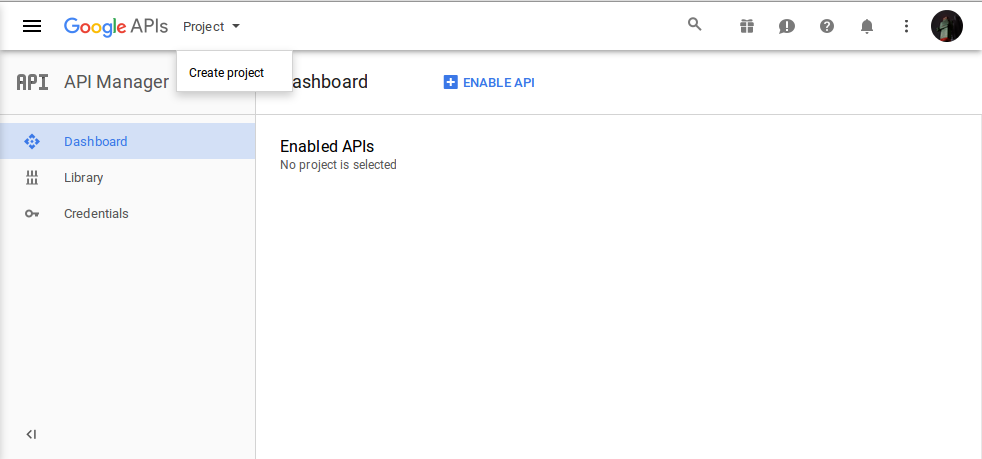
- Go to https://console.developers.google.com/
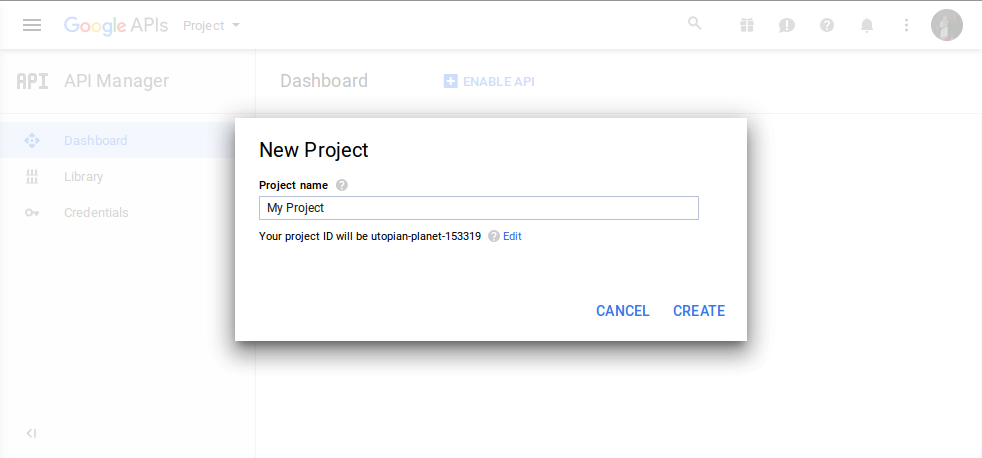
- At the top, click on Project pull down and select Create Project
- Give the project a meaningful project name and click Create
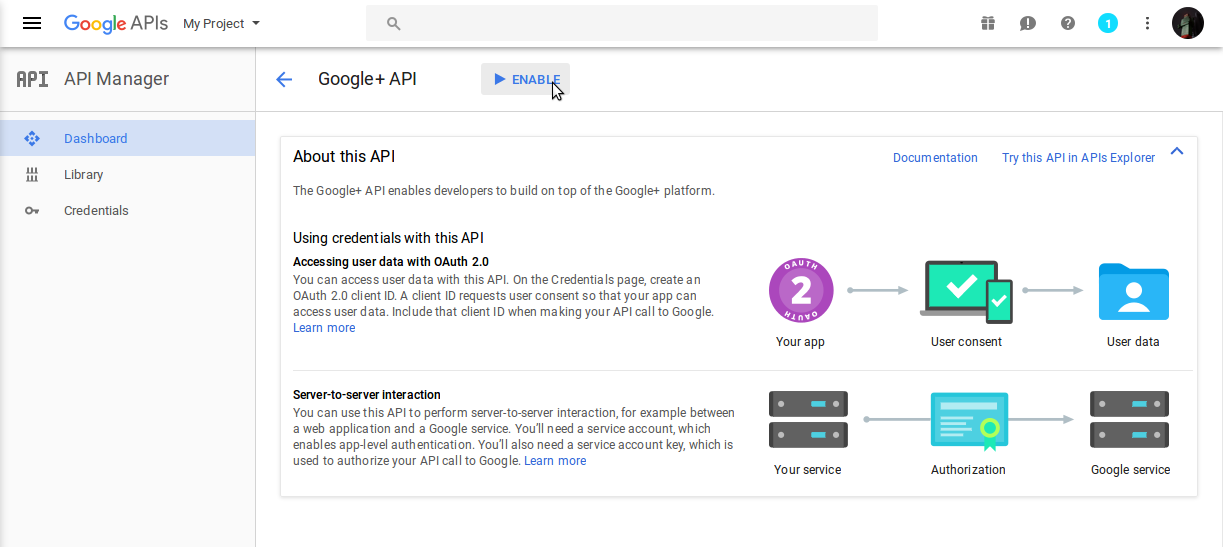
- Click on Library > Social APIs > Google+ API
- Click on Enable
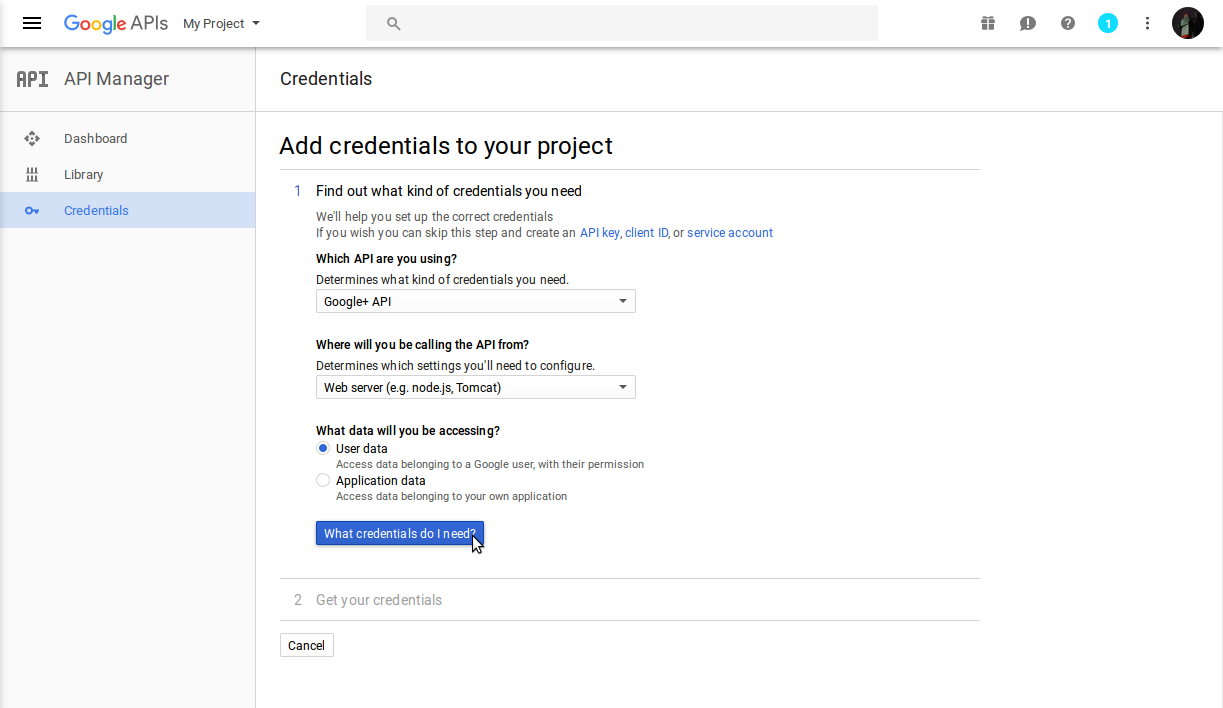
- Click on [Create credentials]
-
Select the following:
- Which API are you using? Google+ API
- Where will you be calling the API from? Web server node.js
- What data will you be accessing? User data
- Click on [What credentials do I need]
-
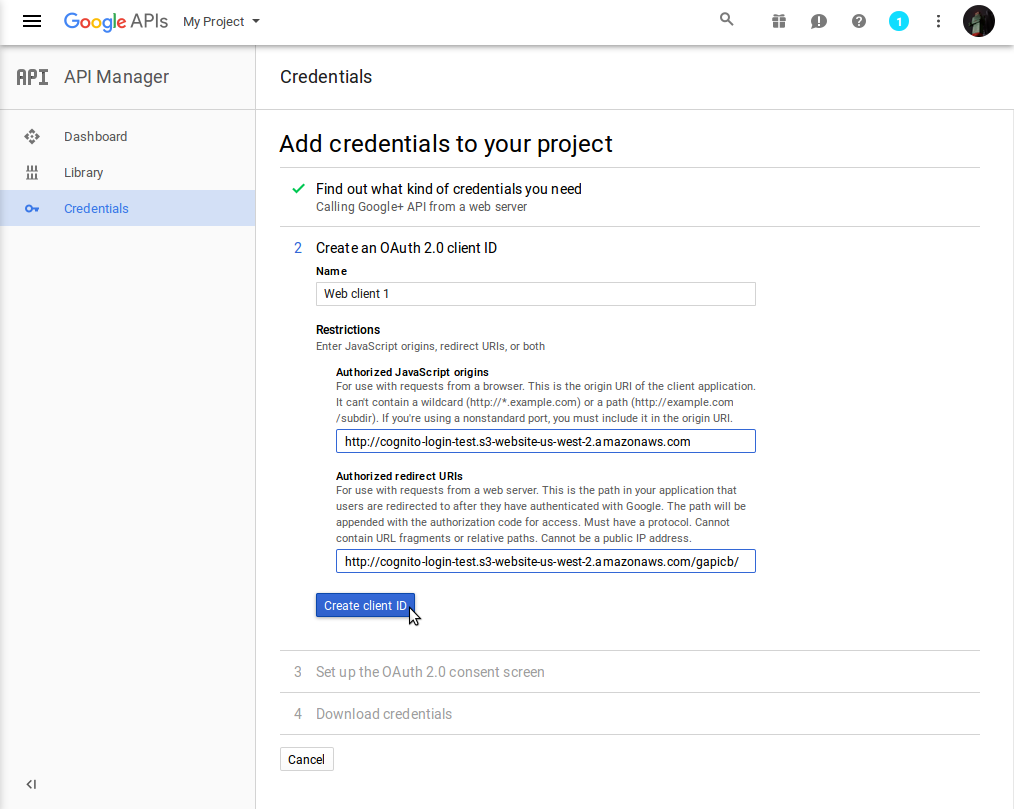
Enter the following:
- Name: "Enter a meaningful client name"
- Authorized JavaScript origins: "The S3 endpoint provided in Step 3.8 minus the last /" eg: (http://cognito-login-test.s3-website-us-west-2.amazonaws.com)
- Authorized redirect URIs: "The full path to your callback page" eg: (http://cognito-login-test.s3-website-us-west-2.amazonaws.com/gapicb/)
- Click on [Create client ID]
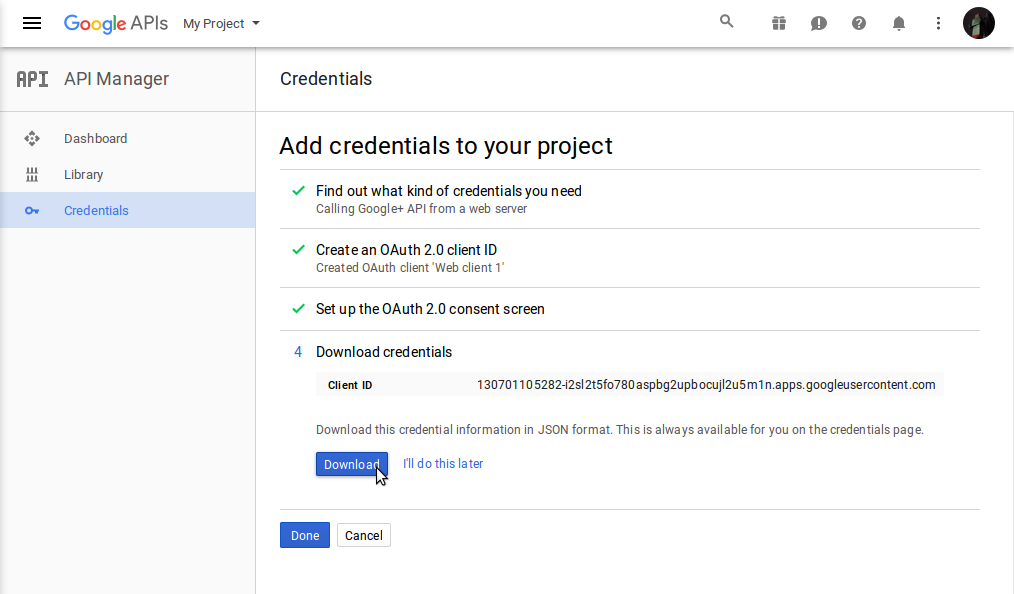
- Select your Email address and type in a "Product name shown to users" and click [Continue]
- Download the credentials (these will be needed in the following steps) and click on [Done]

Step 5: Create Cognito Identity Pool
Users authenticated with Google+ will assume a Cognito Auth role which allows them access to the API Gateway.
- Login to the AWS Cognito console
- Click on [Manage Federated Identities]
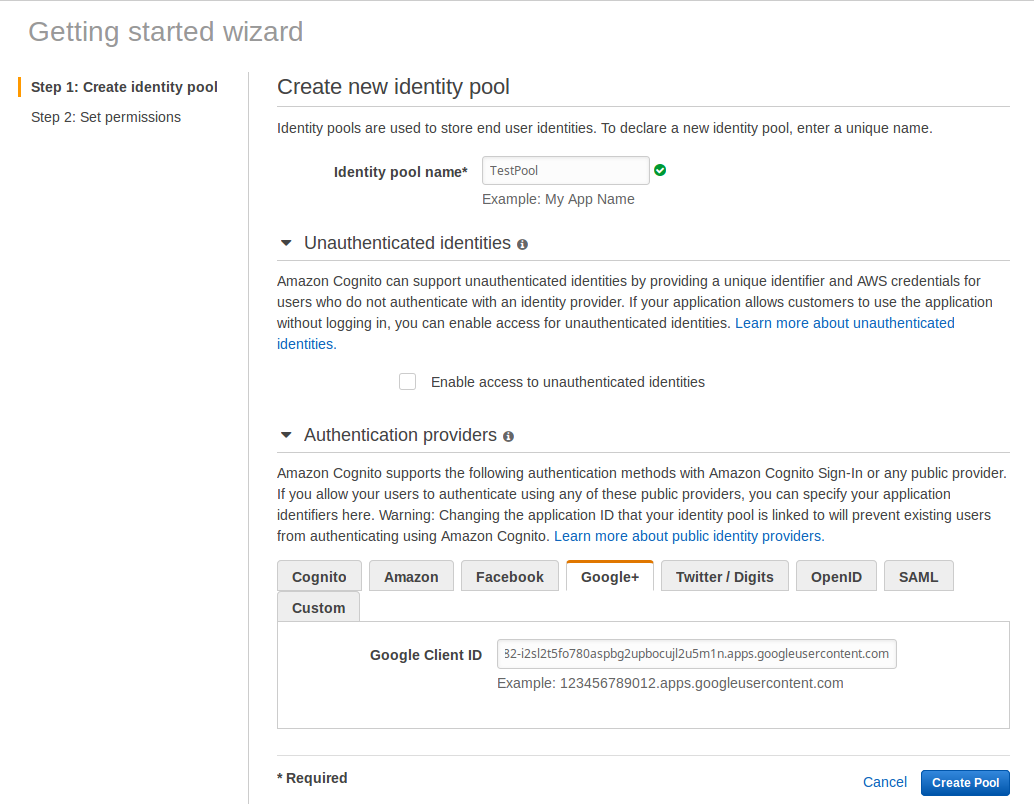
- For Identity Pool Name enter your application name
- Expand Authentication Providers and select Google+
- Enter the Google Client ID from the credentials downloaded in Step 4.10
- Click on [Create Pool]
- Cognito will create roles for Auth and Unauth users, click [Allow] (These will be edited in Step 9.11)
- You can now select JavaScript from the Platform pulldown and download the latest SDK, however I prefer to include it from sdk.amazonaws.com instead
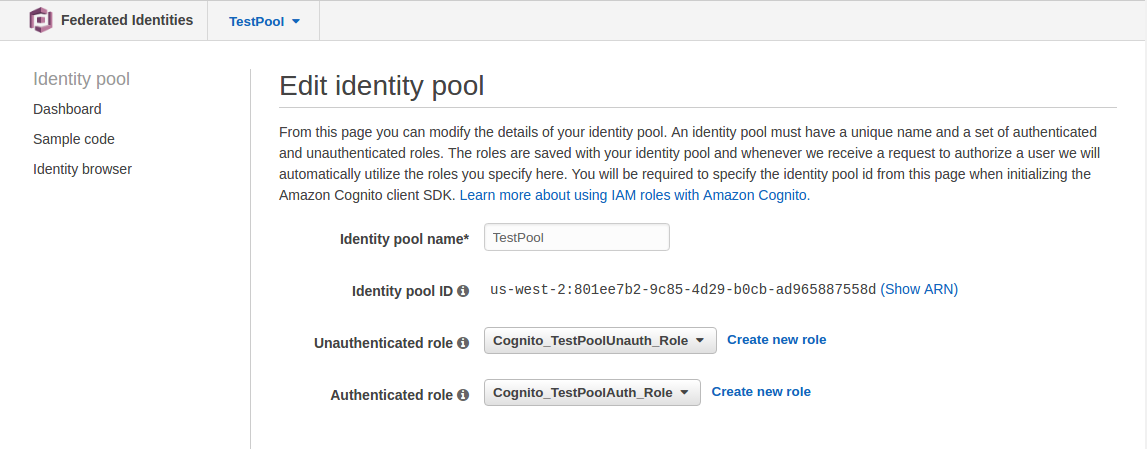
- Click on [Go to dashboard] and Edit Identity pool
- Make note of the Identity Pool ID, we will use this in Step 10.3.d
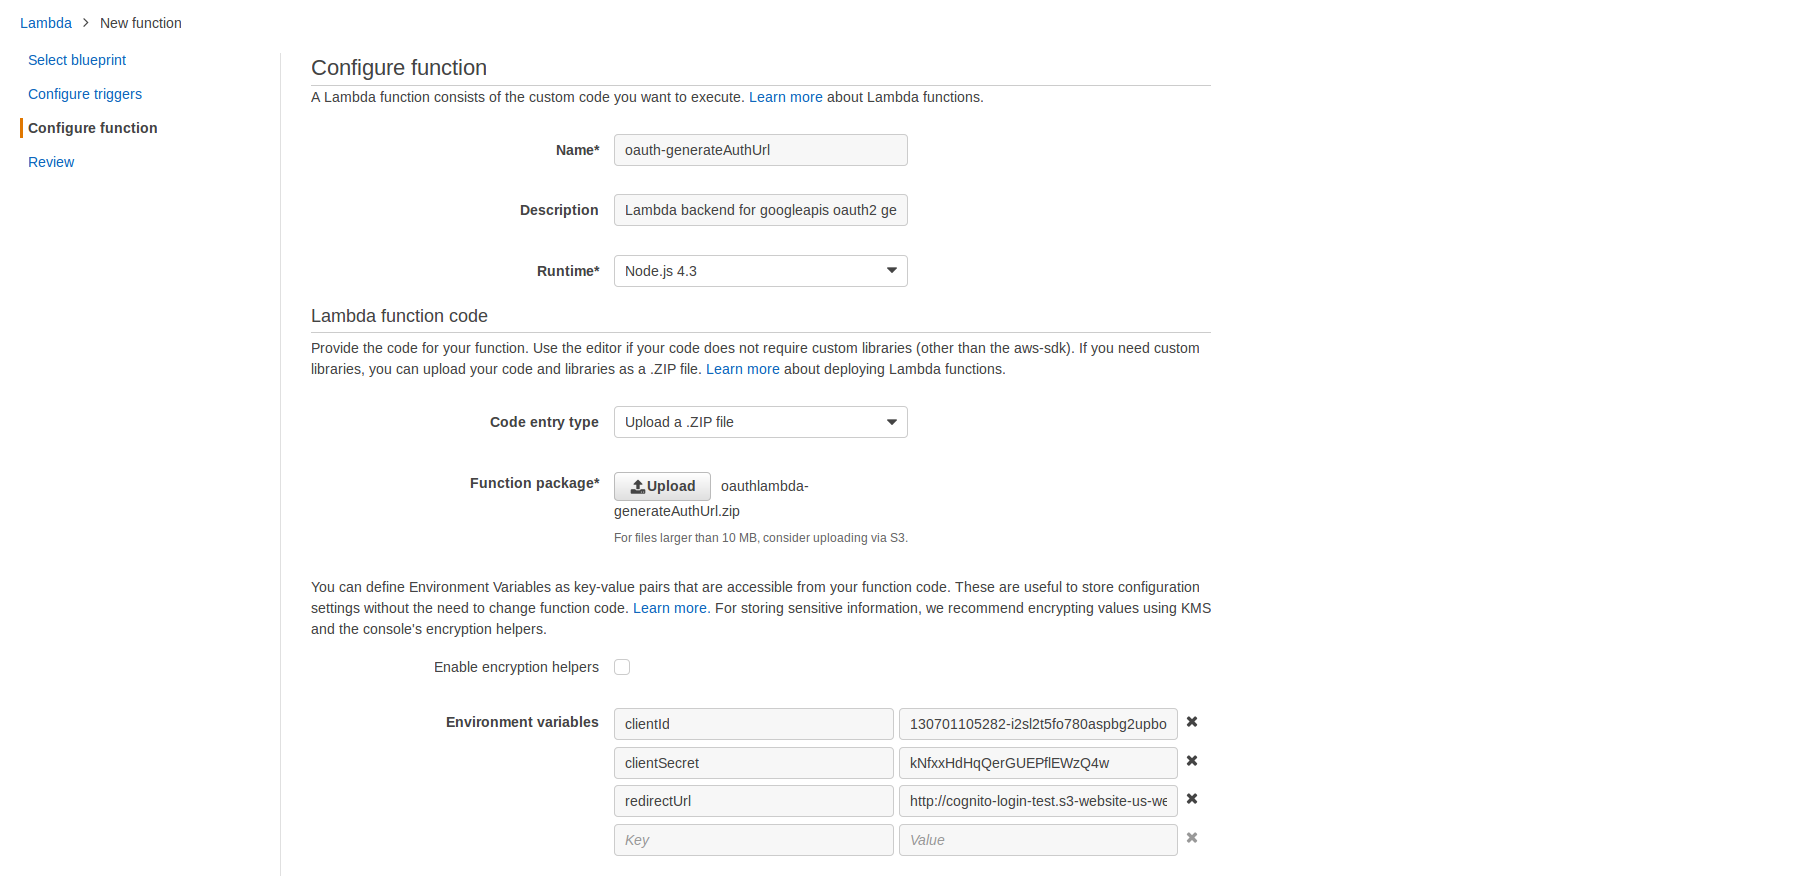
Step 6: Lambda - generateAuthUrl
The authorization URL that end users visit to login is generated via the Google+ API. This API call requires the clientId and clientSecret created in Step 4. This API call could be made client side but in order to keep these values secret we will create a Lambda function to make the call from the "server-side".
- Download and save the following zip file: https://github.com/kyle138/oauthlambda-generateAuthUrl/releases/download/1.0.0/oauthlambda-generateAuthUrl.zip
- Login to the AWS Lambda console
- Click on [Create a Lambda function]
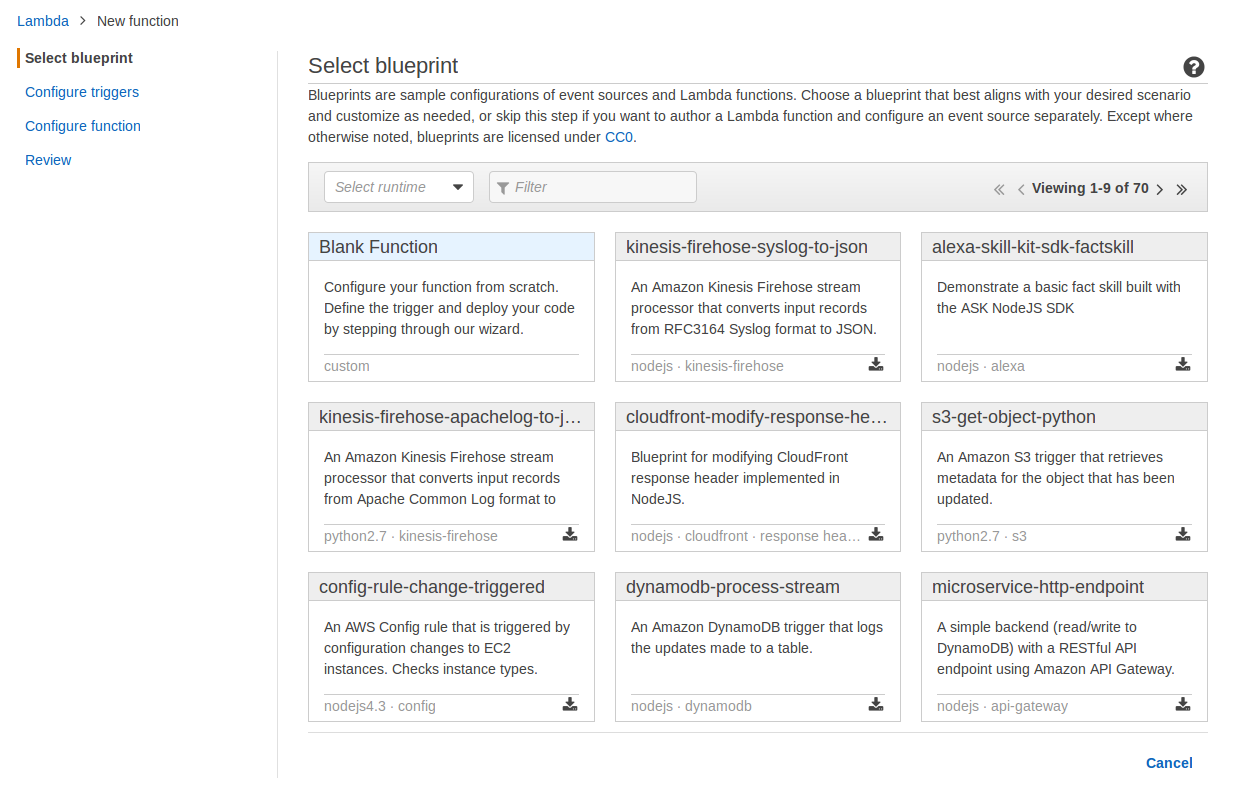
- For Select Blueprint click on Blank Function
- For Configure Triggers click on [Next]
- For Name enter oauth-generateAuthUrl
- For Description enter Lambda backend for googleapis oauth2 generateAuthUrl
- For RunTime select Node.js 4.3
- For Code Entry Type select Upload a .ZIP file
- Click on [Upload] and select the oauthlambda-generateAuthUrl.zip file you downloaded in Step 6.1
-
Create three Environment Variables using the exact KEY names below and substituting the values you downloaded in Step 4.10:
clientId Enter the Google API Client ID that you downloaded in Step 4.10 clientSecret Enter the Google API Client Secret that you downloaded in Step 4.10 redirectUrl Enter the authorized redirect URI that you specified in Step 4.8.c - Leave Handler with the default index.handler
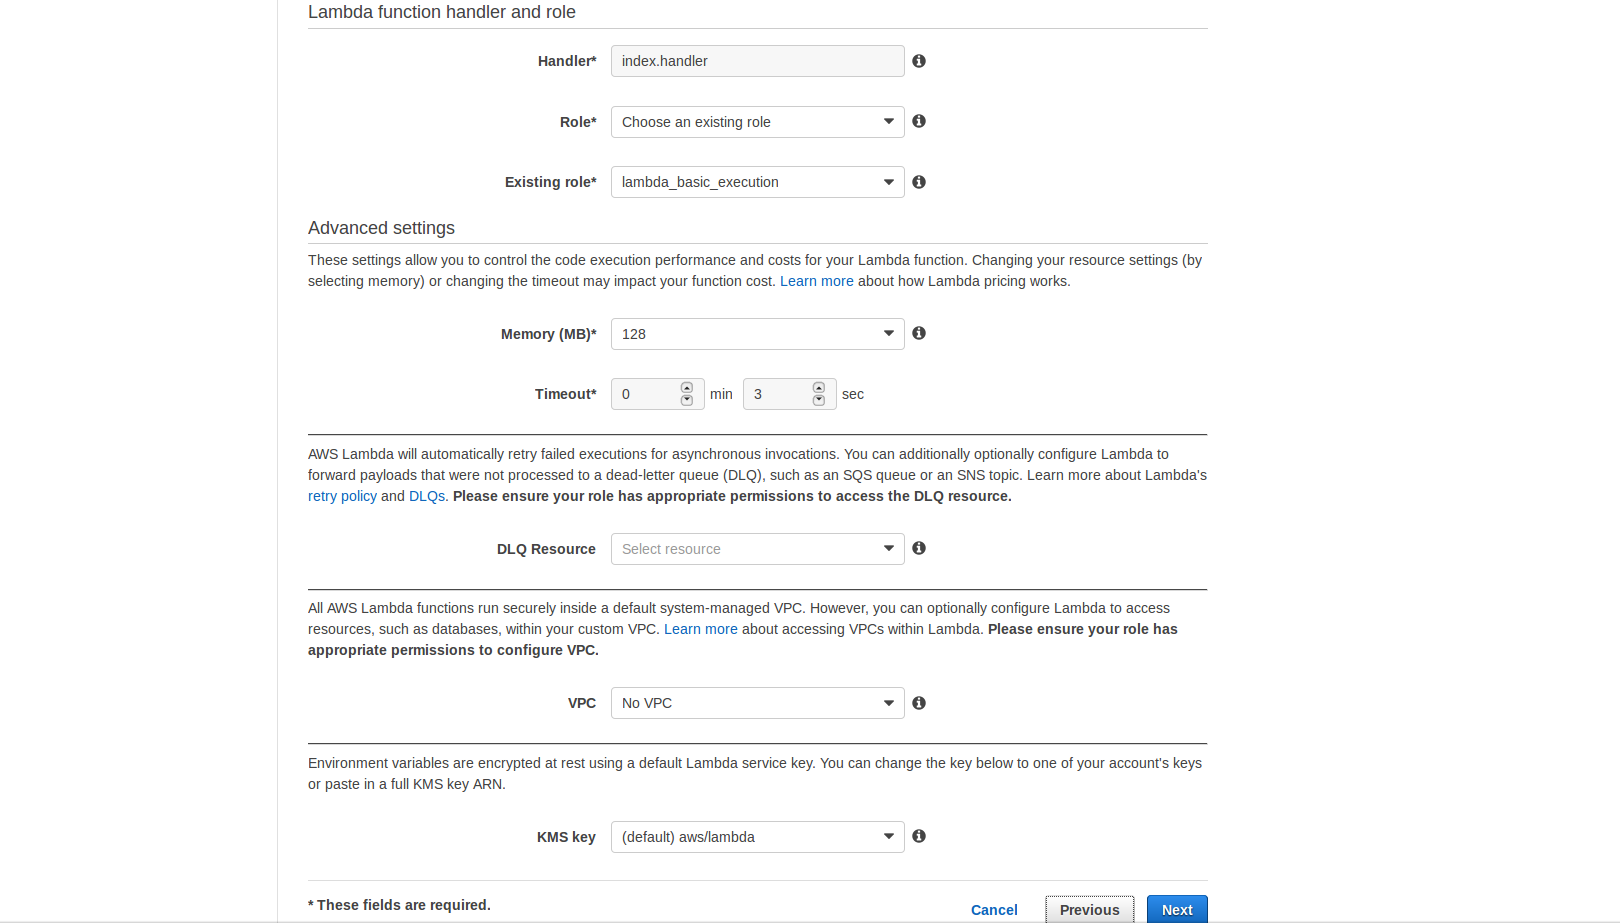
- For Role select Choose an existing role
- For Existing Role select lambda_basic_execution
- Leave Memory and Timeout with their default settings of 128mb and 3sec
- For VPC select No VPC
- Click on [Next]
- Review the settings and click on [Create function]
- Click on [Test] and in the results you should see your generated oauth2 google URL
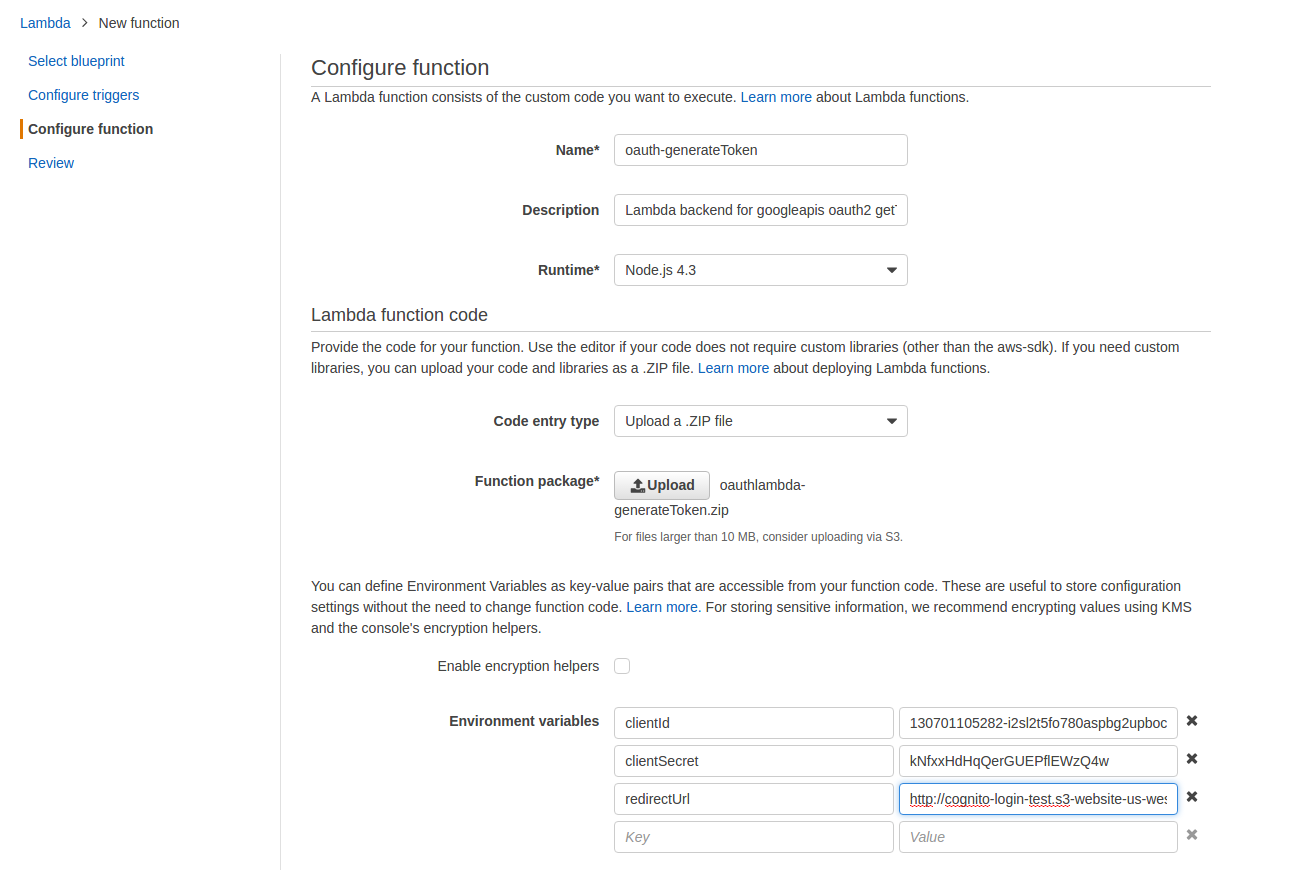
Step 7: Lambda - generateToken
The code received from the Google+ callback will need to be exchanged for identity tokens. This function also retrieves the email account of the user logging in and checks its domain to see if it is allowed. It returns the tokens and email account in a JSON object.
- Download and save the following zip file: https://github.com/kyle138/oauthlambda-generateToken/releases/download/1.0.0/oauthlambda-generateToken.zip
- Login to the AWS Lambda console
- Click on [Create a Lambda function]
- For Select Blueprint click on Blank Function
- For Configure Triggers click on [Next]
- For Name enter oauth-generateToken
- For Description enter 'Lambda backend for googleapis oauth2 getToken'
- For RunTime select Node.js 4.3
- For Code Entry Type select Upload a .ZIP file
- Click on [Upload] and select the oauthlambda-generateToken.zip file you downloaded in Step 7.1
-
Create three Environment Variables using the exact KEY names below and substituting the values you downloaded in Step 4.10:
clientId Enter the Google API Client ID that you downloaded in Step 4.10 clientSecret Enter the Google API Client Secret that you downloaded in Step 4.10 redirectUrl Enter the authorized redirect URI that you specified in Step 4.8.c - Leave Handler with the default index.handler
- For Role select Choose an existing role
- For Existing Role select lambda_basic_execution
- Leave Memory and Timeout with their default settings of 128mb and 3sec
- For VPC select No VPC
- Click on [Next]
- Review the settings and click on [Create function]
- We cannot test this function as it is expecting the code input which we do not have yet

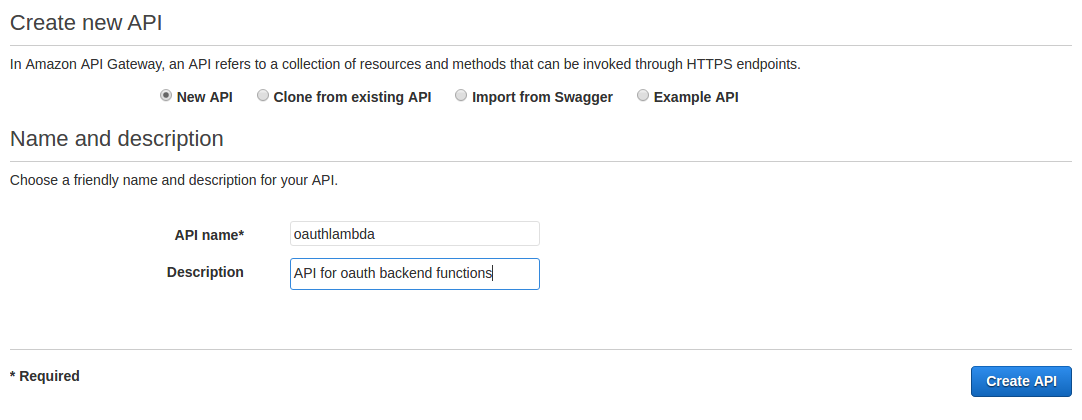
Step 8: API Gateway - oAuth
This API Gateway will serve the genAuthUrl and genToken Lambda functions created in the two previous sections. These will need to be called before the user is authenticated so these endpoints will not need authorization.
- Login to the AWS API Gateway console
- Click on Create API
- Select New API
- For name enter oauthlambda
- For description enter 'API for oauth backend functions'
- Click on [Create API]
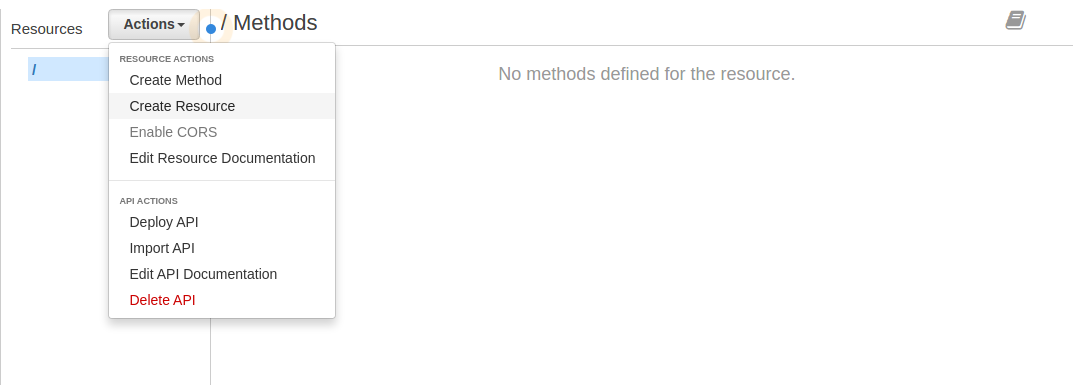
- Pull down the Actions menu and select Create Resource
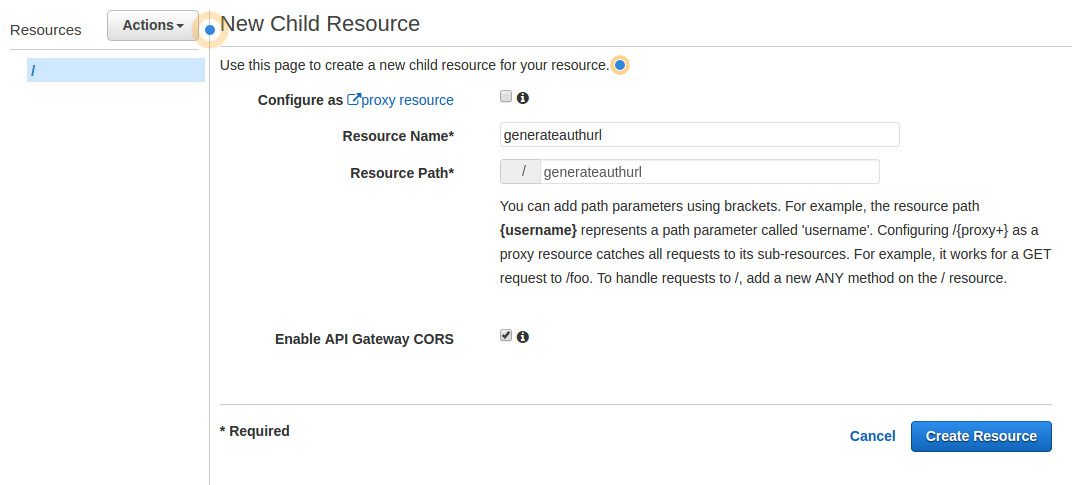
- For Resource Name enter generateauthurl, this should automatically populate Resource Path with /generateauthurl
- Check the Enable API Gateway CORS box
- Click on [Create Resource]
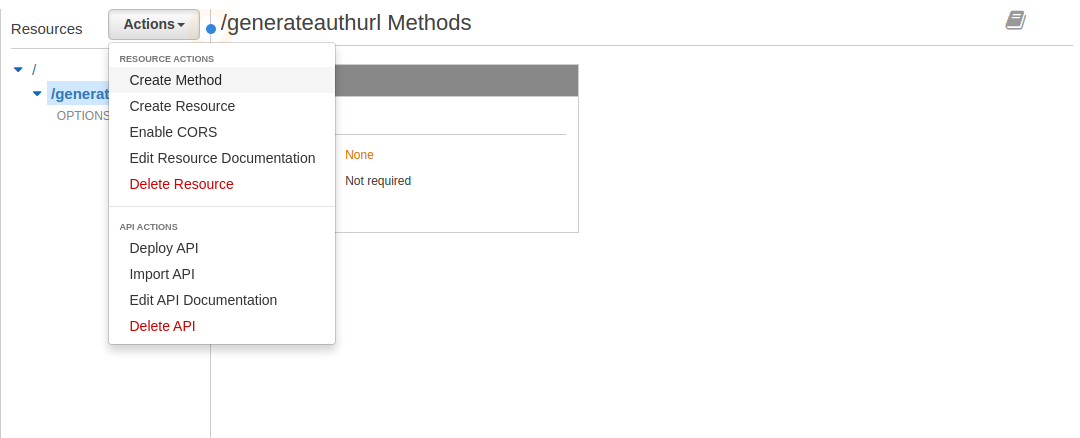
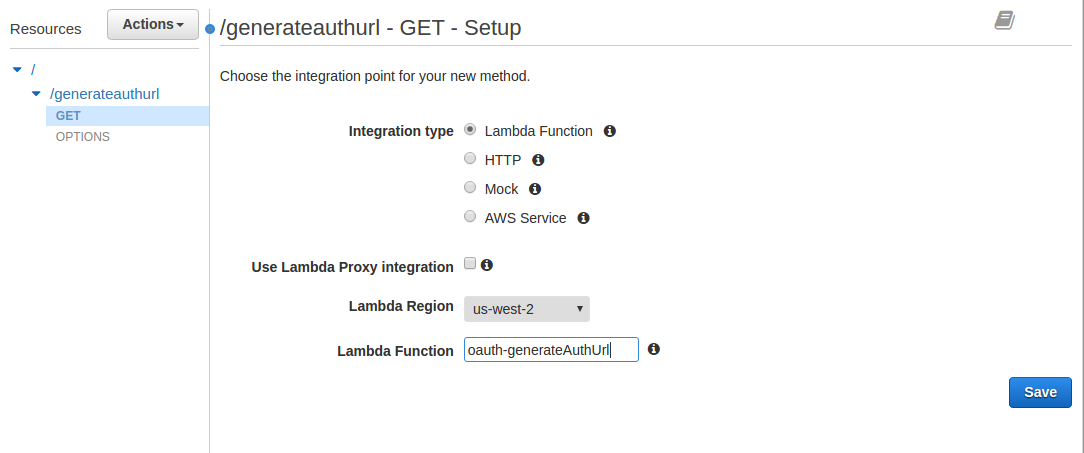
- Make sure the newly created /generateauthurl resource is highlighted and pull down the Actions menu and select Create Method
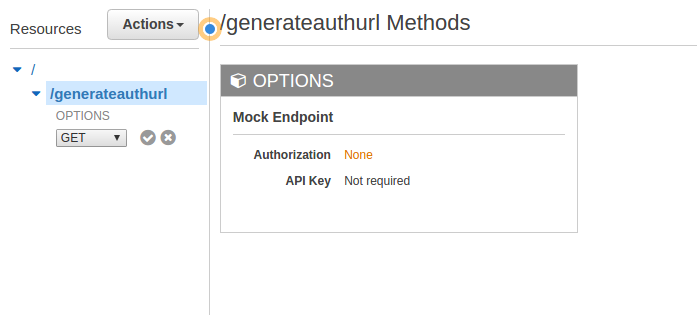
- From the pulldown menu select GET and click the checkmark
- For Integration Type select Lambda Function
- For Lambda Region select the region your Lambda function was created in
- For Lambda Function enter oauth-generateAuthUrl
- Click on [Save]
- Click [OK]
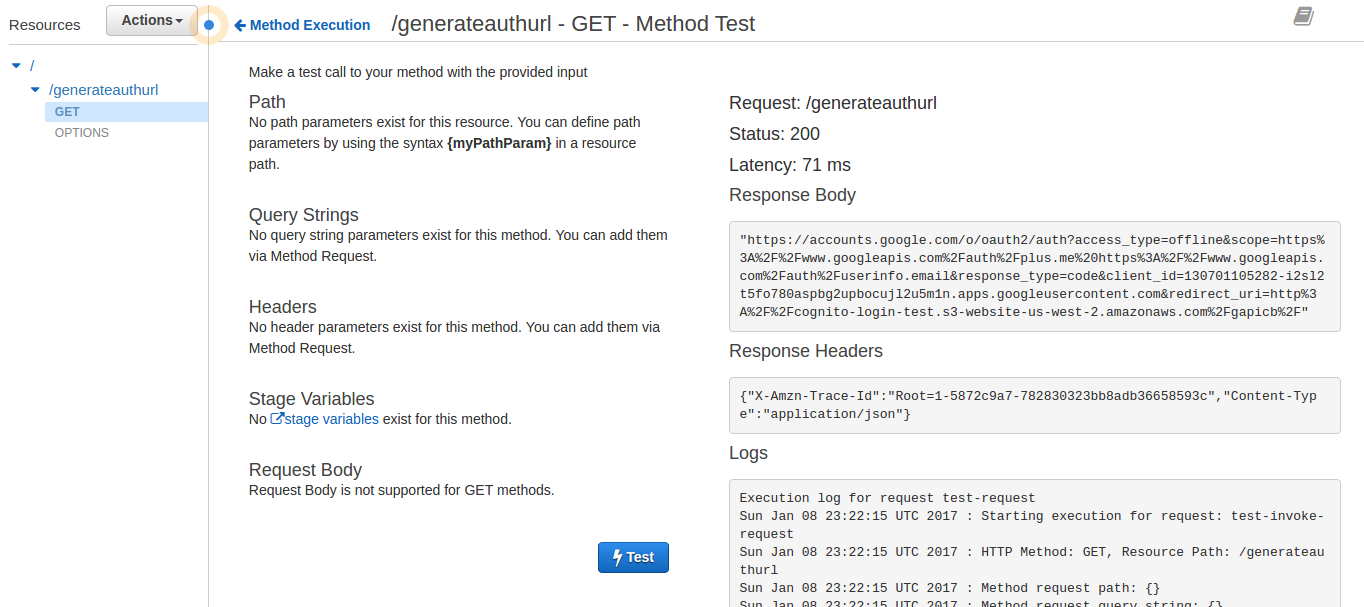
- Click on Test and then click on [Test], the Response Body should be the generated Google oauth URL.
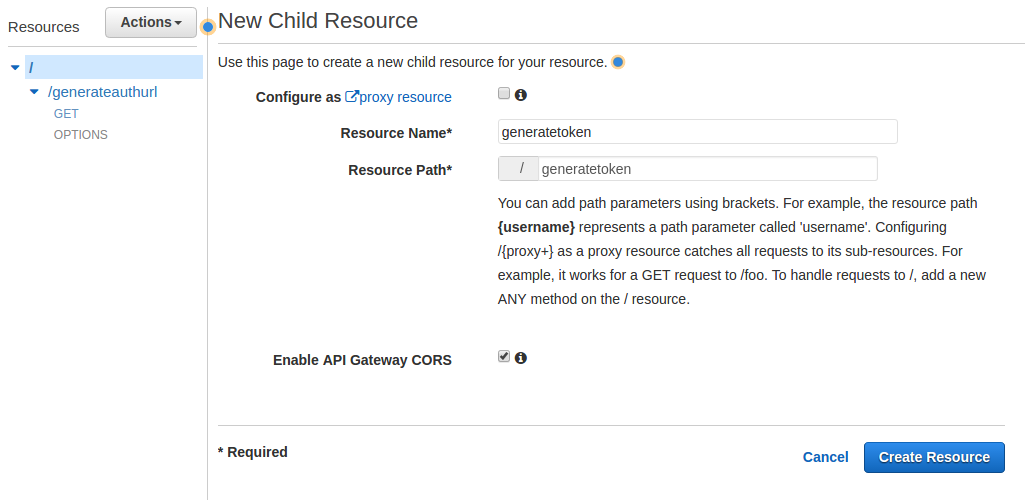
- In the Resources panel click on the root / resource to select it
- Pull down the Actions menu and select Create Resource
- For Resource Name enter generatetoken, this should automatically populate resource path with /generatetoken
- Check the Enable API Gateway CORS box
- Click on [Create Resource]
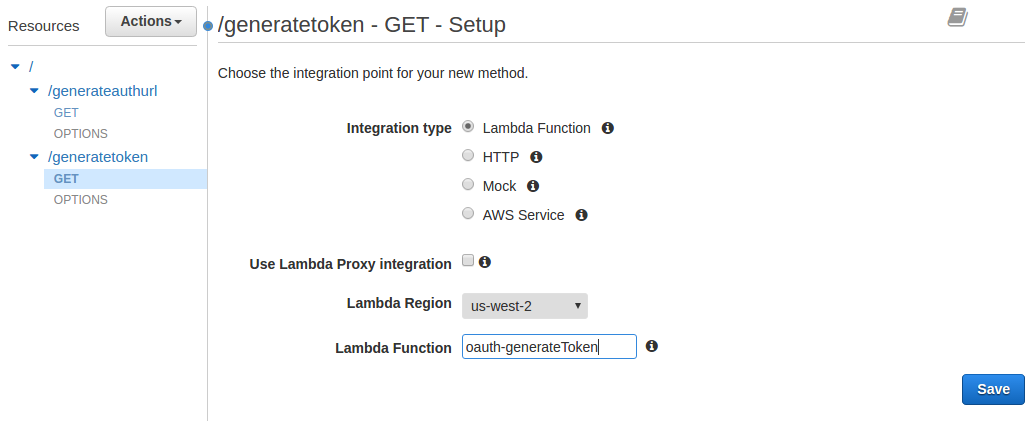
- Make sure the newly created /generatetoken resource is highlighted and pull down the Actions menu and select Create Method
- From the pulldown menu select GET and click the checkmark
- For Integration Type select Lambda Function
- For Lambda Region select the region your Lambda function was created in
- For Lambda Function enter oauth-generateToken
- Click on [Save]
- Click on [OK]
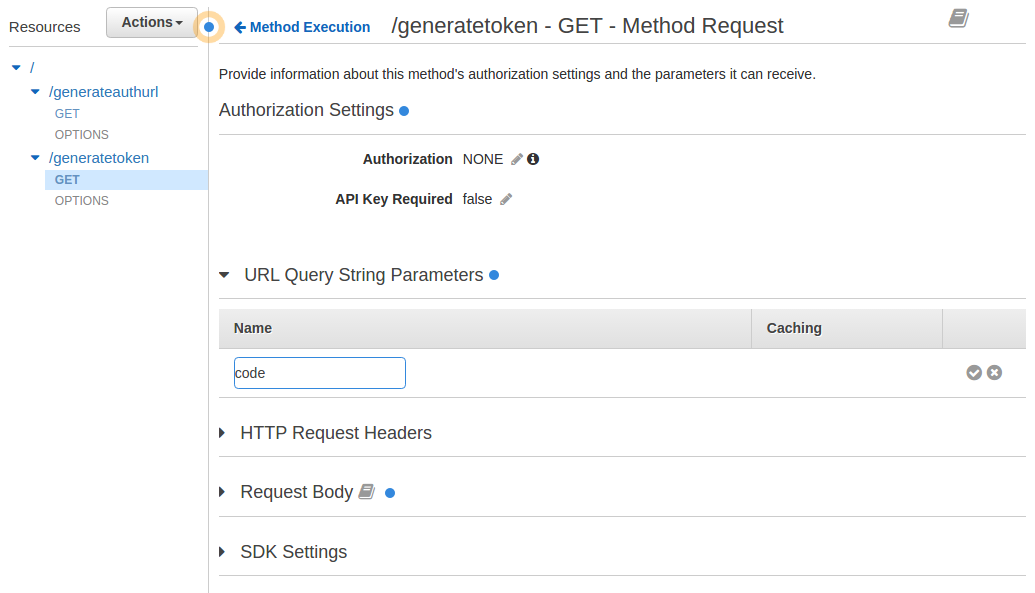
- Click on Method Request
- Click on URL Query String Parameters
- Click on + Add query string
- For name enter the word code and click the checkmark
- Click on <-Method Execution to return to the Method page
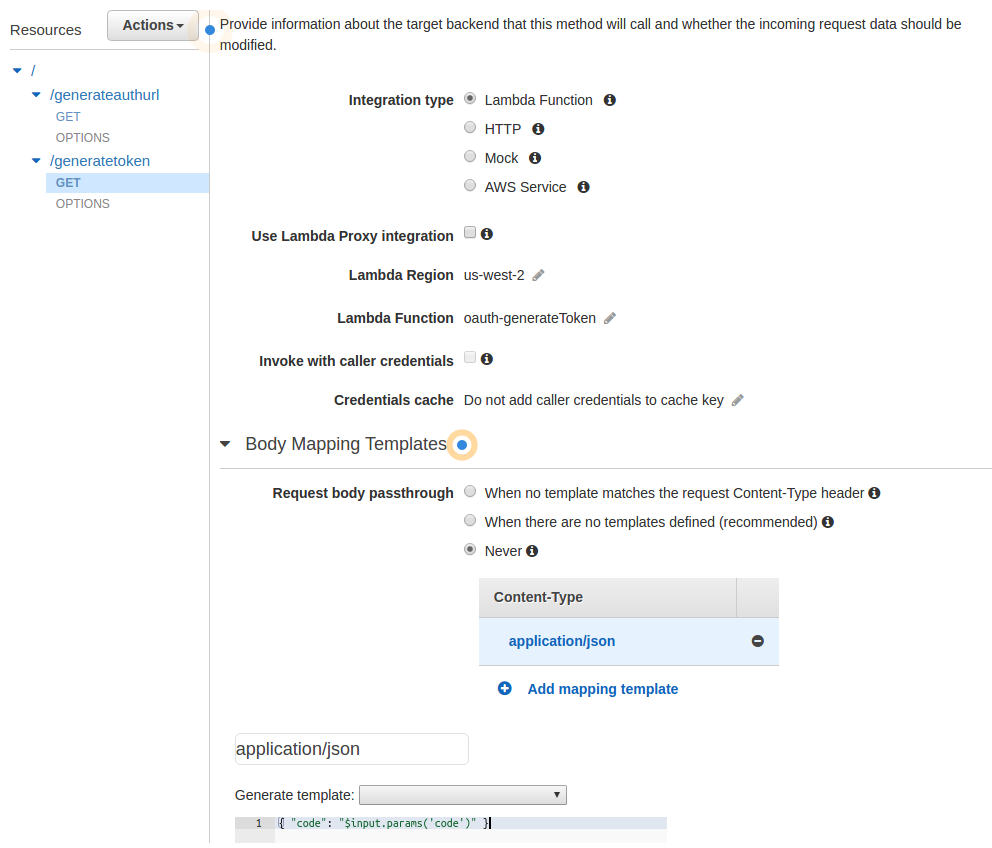
- Click on Integration Request
- Click on Body Mapping Templates to expand it
- For Request Body Passthrough select Never
- Click on + Add Mapping Template and type in application/json and click the checkmark
-
In the Generate Template box enter the following:
{ "code": "$input.params('code')" } - Click on [Save]
- In the Resources panel click on the root / resource to select it
- Pull down the Actions menu and select Deploy API
- For Deployment Stage select [New Stage]
- For Stage Name enter prod
- For Stage Description enter Production API Stage
- Click on [Deploy]
- This should take you to the prod Stage Editor page and the Invoke URL should be highlighted in blue at the top of the page. Copy this URL as you will need it in the Step 10.3
Step 9: IAM Role for Cognito Authenticated Users
When a user is authenticated and their Google+ token is exchanged for a Cognito token they are given a temporary IAM SecretAccessKey which assumes the Cognito_PoolNameAuth_Role created earlier. To control what access these authenticated users have a policy has to be created and attached to that role.
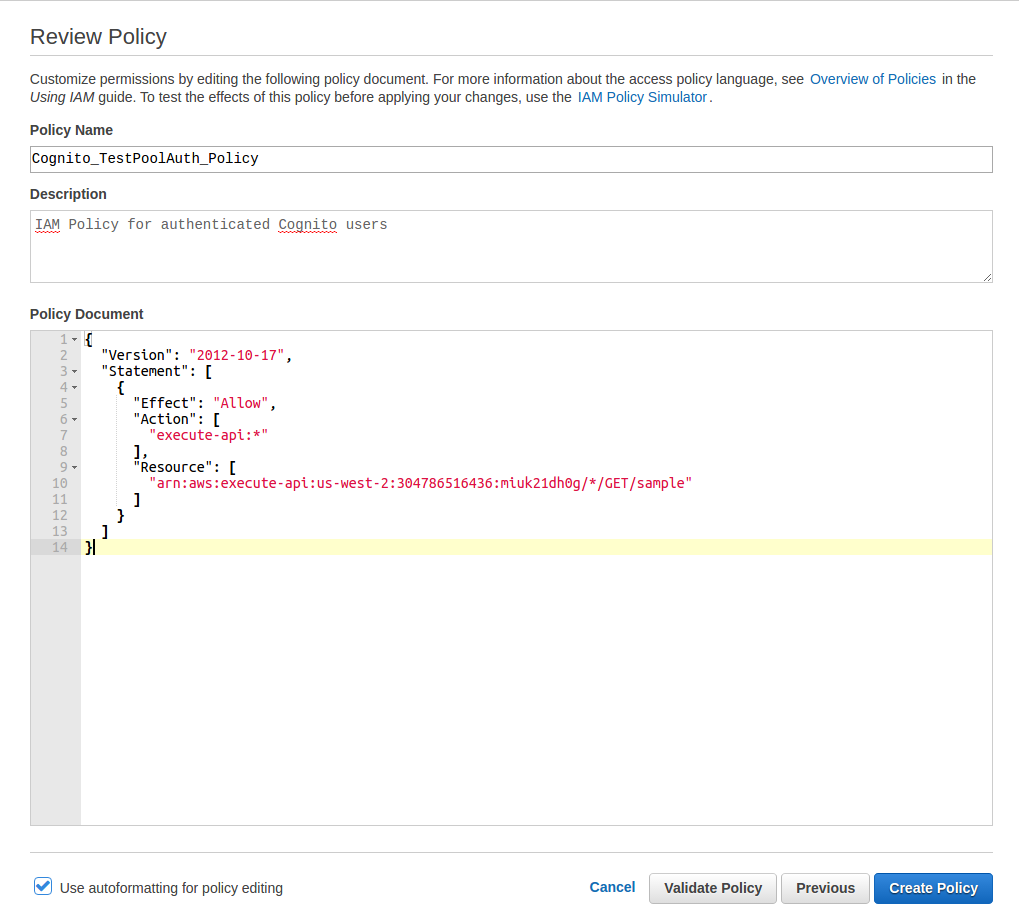
- Login to the AWS IAM console
- Click on Policies
- Click on [Create Policy]
- Next to Create Your Own Policy click on [Select]
- For Policy Name enter Cognito_PoolNameAuth_Policy replacing PoolName with the name you gave your Cognito Identity Pool in Step 5.3
- For Description enter 'IAM Policy for authenticated Cognito users.'
-
Enter the following for Policy Document making sure to replace the Resource value with the ARN string you copied in Step 2.23 :
{ "Version": "2012-10-17", "Statement": [ { "Effect": "Allow", "Action": [ "execute-api:*" ], "Resource": [ "arn:aws:execute-api:us-west-2:304786516436:miuk21dh0g/*/GET/sample" ] } ] } - Click on [Validate Policy]
- If the policy validates click on [Create Policy]
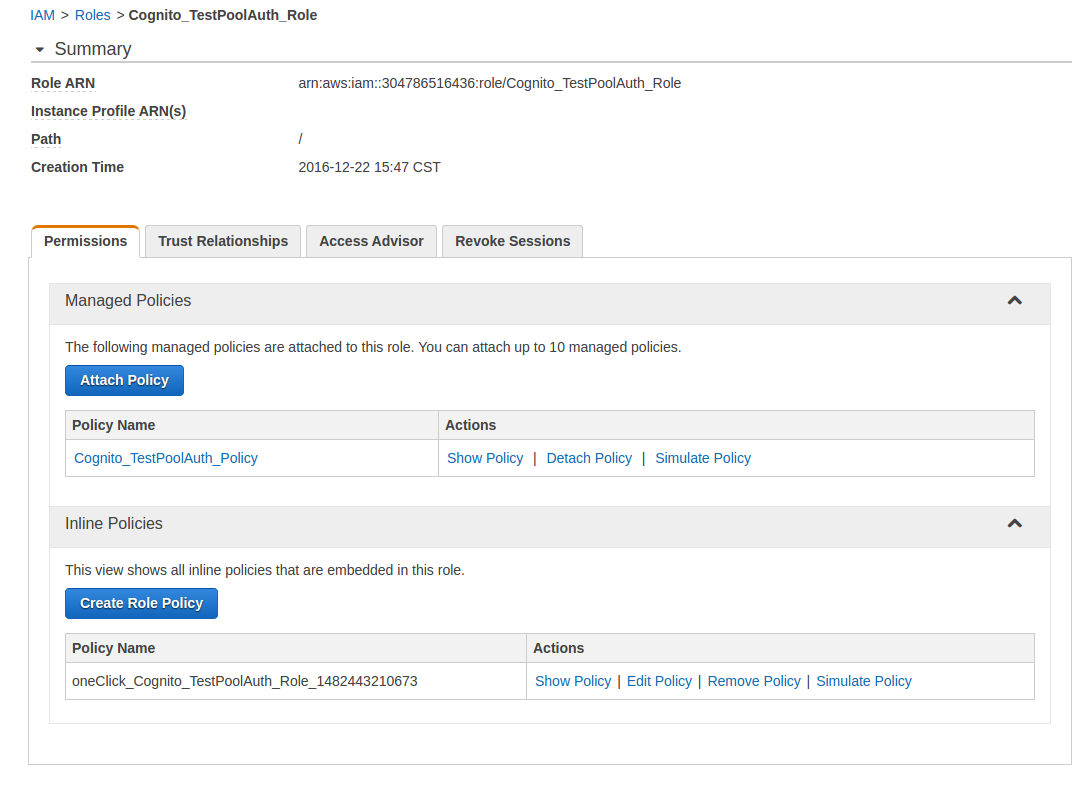
- In the left panel click on Roles
- Click on the Cognito_PoolNameAuth_Role that was auto-created in Step 5.7
- On the Permissions tab click on Attach Policy
- Select the Cognito_PoolNameAuth_Policy that you just created in Step 9.9 and click on [Attach Policy]
Step 10: Upload Frontend Files to S3
This is where it all comes together. Update the frontend code with information from the previous steps and upload it to S3.
- Download and extract the following zip file: https://github.com/kyle138/oauthlambdacognito-example/archive/1.0.2.zip
- Go into the newly extracted oauthlambdacognito-example-1.0.2 directory
-
Rename the config.js.example file to config.js and open the file and edit the following lines:
- For "s3-origin": update the value with the S3 endpoint you created in Step 3.8 prepended with 'http://' and appended with a trailing '/'
- For "apig-generateAuthUrl": update the value with the API Gateway Invoke URL you created in Step 8.48 appended with '/generateauthurl'
- For "apig-generateToken": update the value with the API Gateway Invoke URL you created in Step 8.48 appended with '/generatetoken'
- For "IdentityPoolId": update the value with Cognito Identity Pool ID created in Step 5.10
-
config.js should now look similar to the following, save and close the file:
var configuration = { "s3Origin": "http://cognito-login-test.s3-website-us-west-2.amazonaws.com/", "apigGenerateAuthUrl": "https://x7fogme9hg.execute-api.us-west-2.amazonaws.com/prod/generateauthurl", "apigGenerateToken": "https://x7fogme9hg.execute-api.us-west-2.amazonaws.com/prod/generatetoken", "IdentityPoolId": "us-west-2:801ee7b2-9c85-4d29-b0cb-ad965887558d", "awsRegion": "us-east-1" } - Open the javascript_{date}.zip file you downloaded in Step 2.38
- This zip file should contain an apiGateway-js-sdk/ directory, from within it copy the apigClient.js file and the entire lib/ directory into your oauthlambdacognito-example-1.0.2 directory
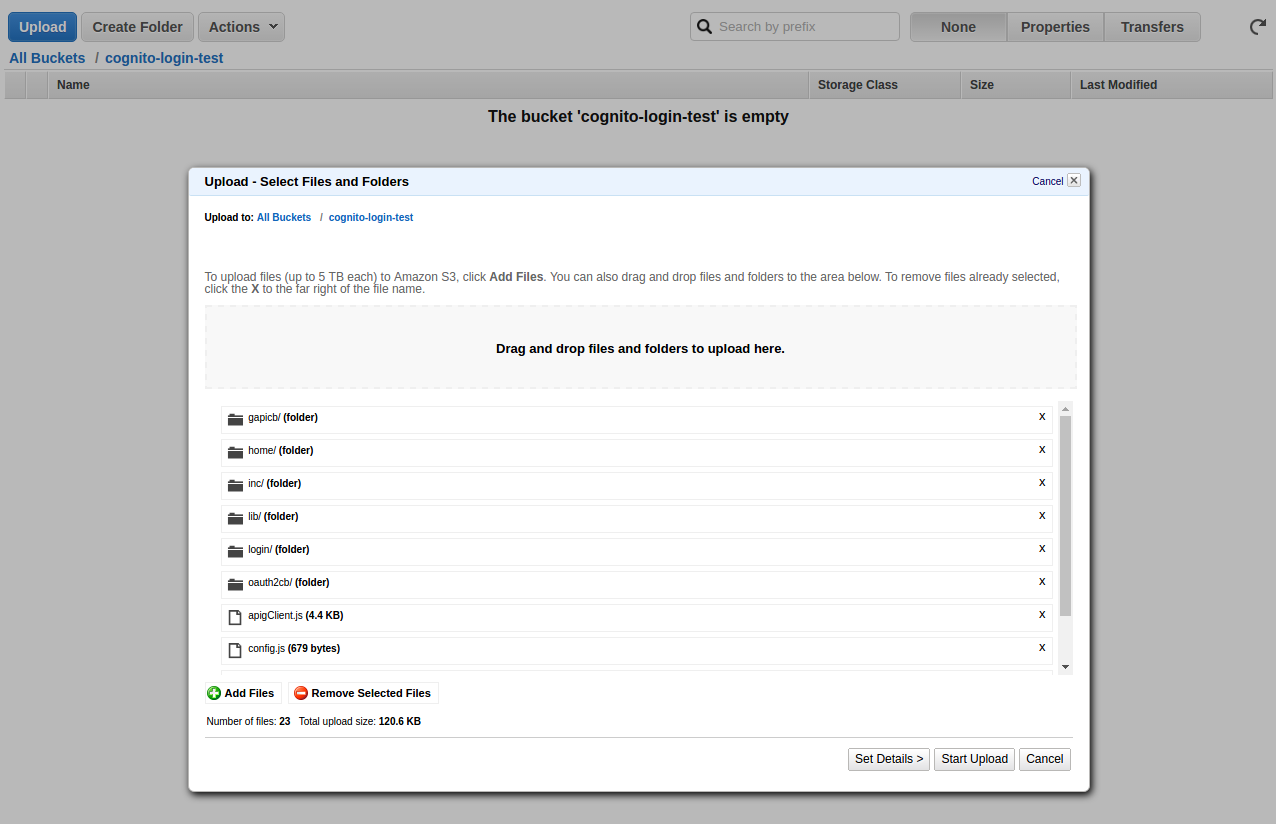
- Login to the AWS S3 console
- Click on the bucket you created in Step 1
- Click on [Upload]
- Select all of the files and folders within the oauthlambdacognito-example-1.0.2 folder and Drag them into the S3 Upload form, click on [Start Upload]
- Visit the S3 endpoint URL created in Step 3.8 in a browser
- Click on the Google Login button and test if you can log in
- ENJOY

Credits:
At the time of this project I couldn't find a single walkthrough for using Cognito with a webapp, only for iOS or Android. I found several how-tos describing parts of the answer and have pieced them together to create this document. I have included those sources below.
- Google API oauth flow with node.js YouTube video created by Michal Stefanow. Before implementing the Cognito Identity Pool you have to first understand Google+ oauth flow itself. This was the best walkthrough I found for implementing it in a single-page webapp using Node.js and Angular.
- Amazon API Gateway Tutorial by Auth0 A modification of the standard Pet Store app using IAM to secure the API Gateway. This walkthrough focuses on using Auth0's own service rather than Cognito but reveals the process of securing and accessing API Gateway using temporary credentials. To be honest, in a public-facing production environment I would recommend using Auth0 as they support multiple identity providers which they maintain preventing you from constantly updating your code. You will need to create an Auth0 account to complete their tutorial but they give you a 30 day free trial.